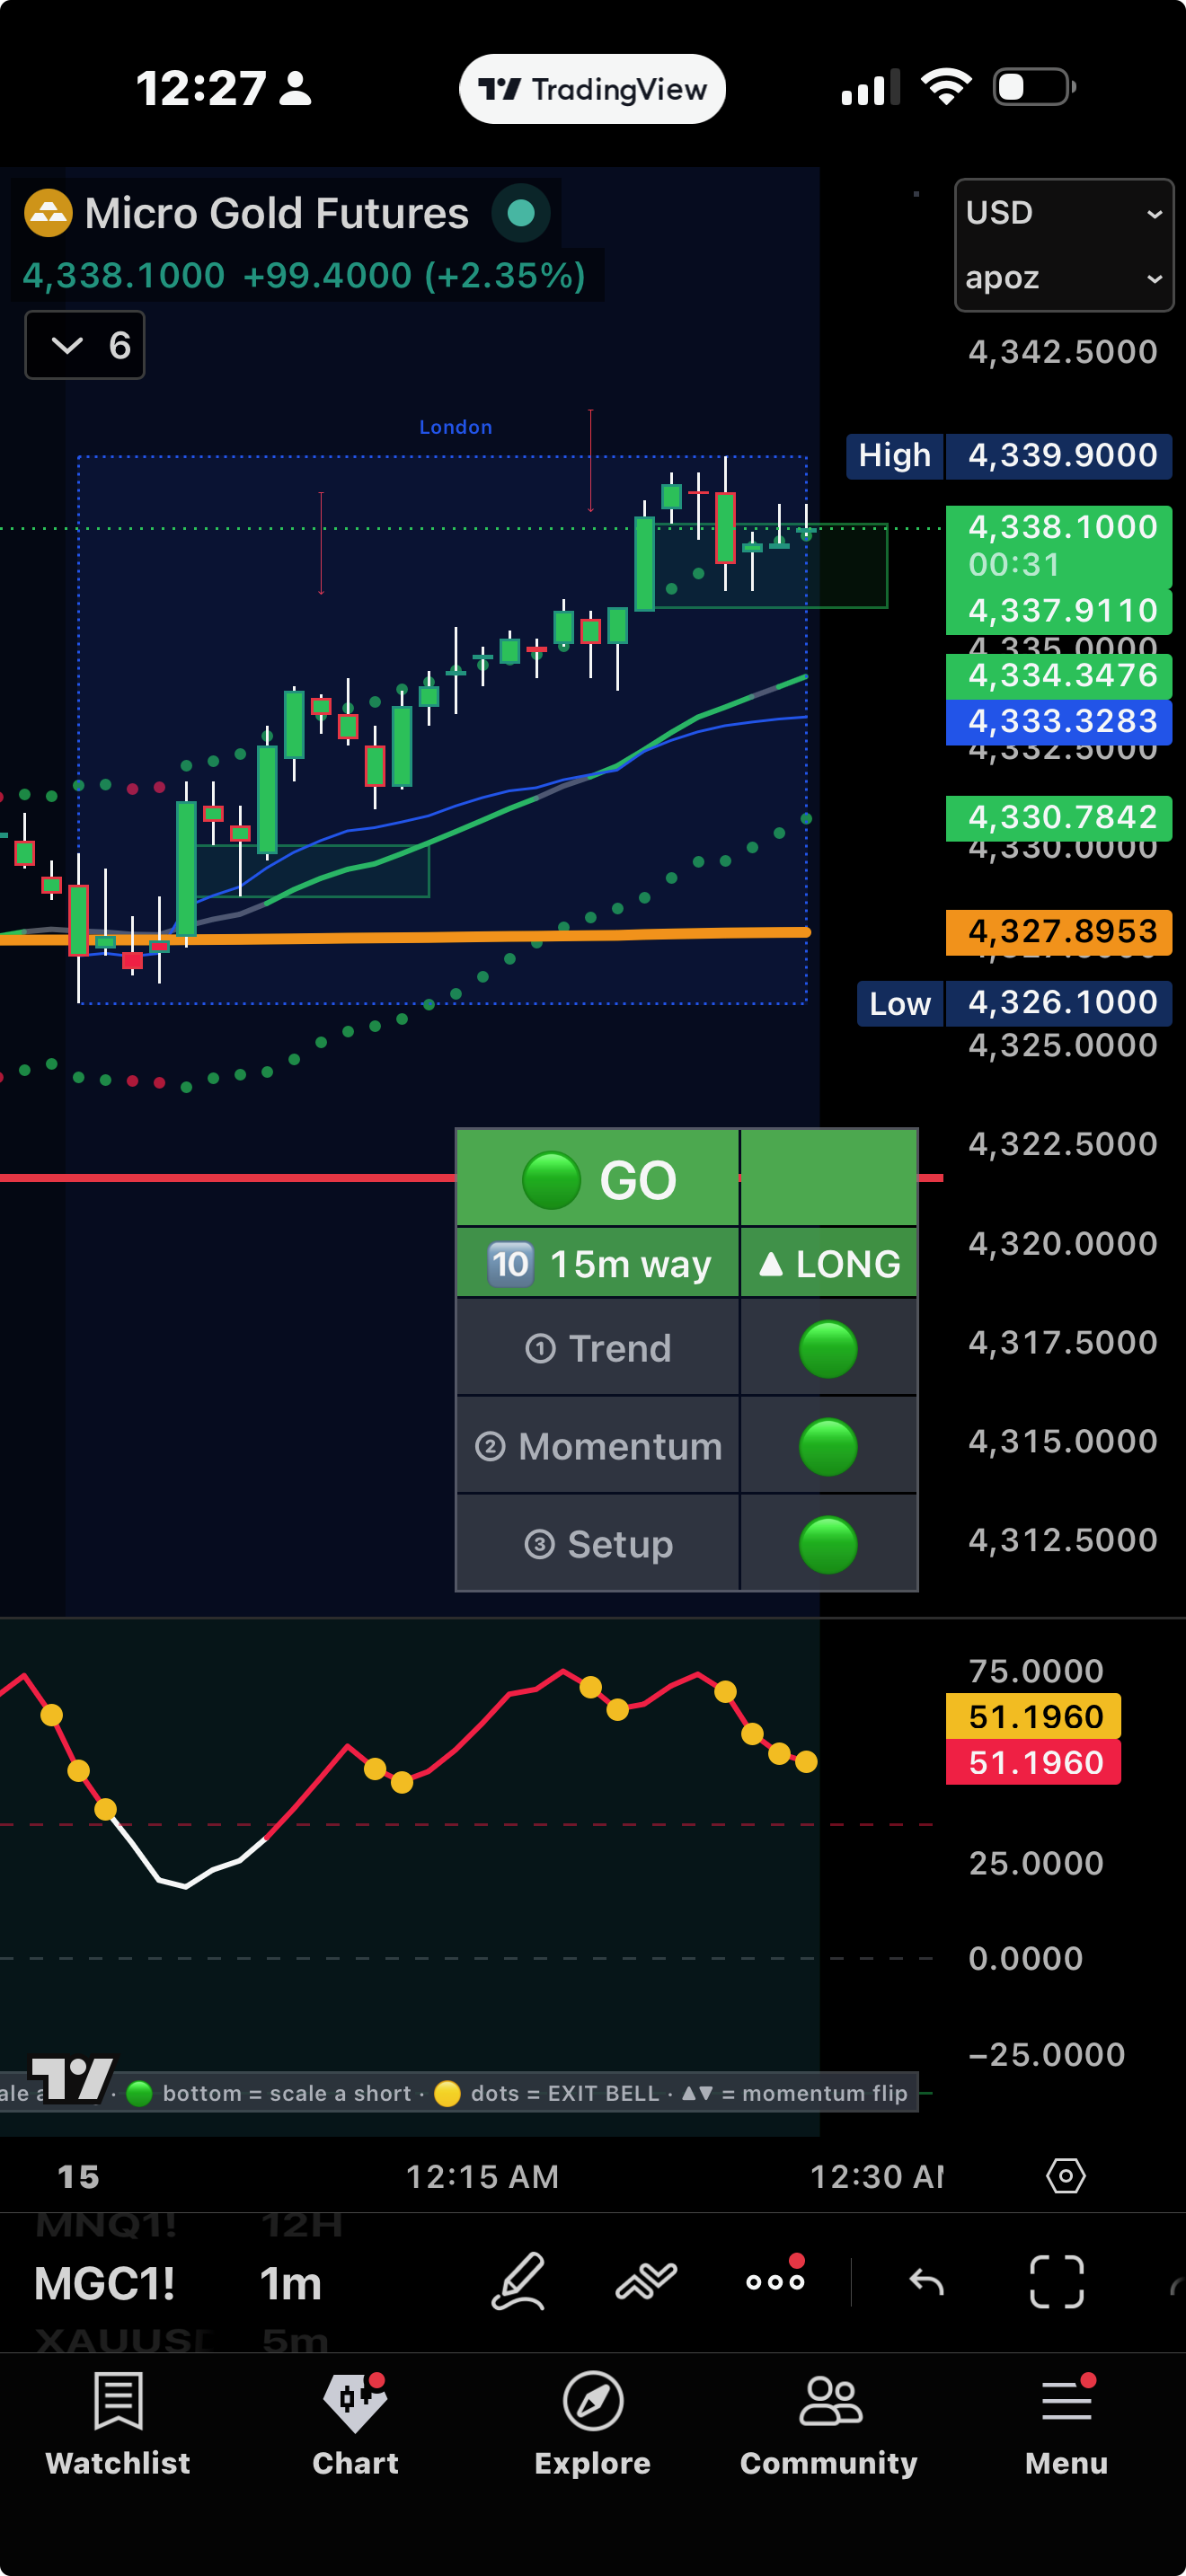
How to use the Green Light Special · When it's green, you go.
Read this first. This tool will not win every trade — nobody can. But here's the secret: you make money by doing 3 easy things. Only trade when the lights say go. Take small losses. Let your wins get big. (And stop when you're up for the day.) This tool helps you do all three. Do what it says and you give yourself the best shot over time.
🟡
Honesty up front: the Green Light Special is a decision tool, not a money machine. No signal wins every time — some trades still lose, and that's normal. The edge is filtering, risk/reward, and discipline. This playbook teaches you all three.
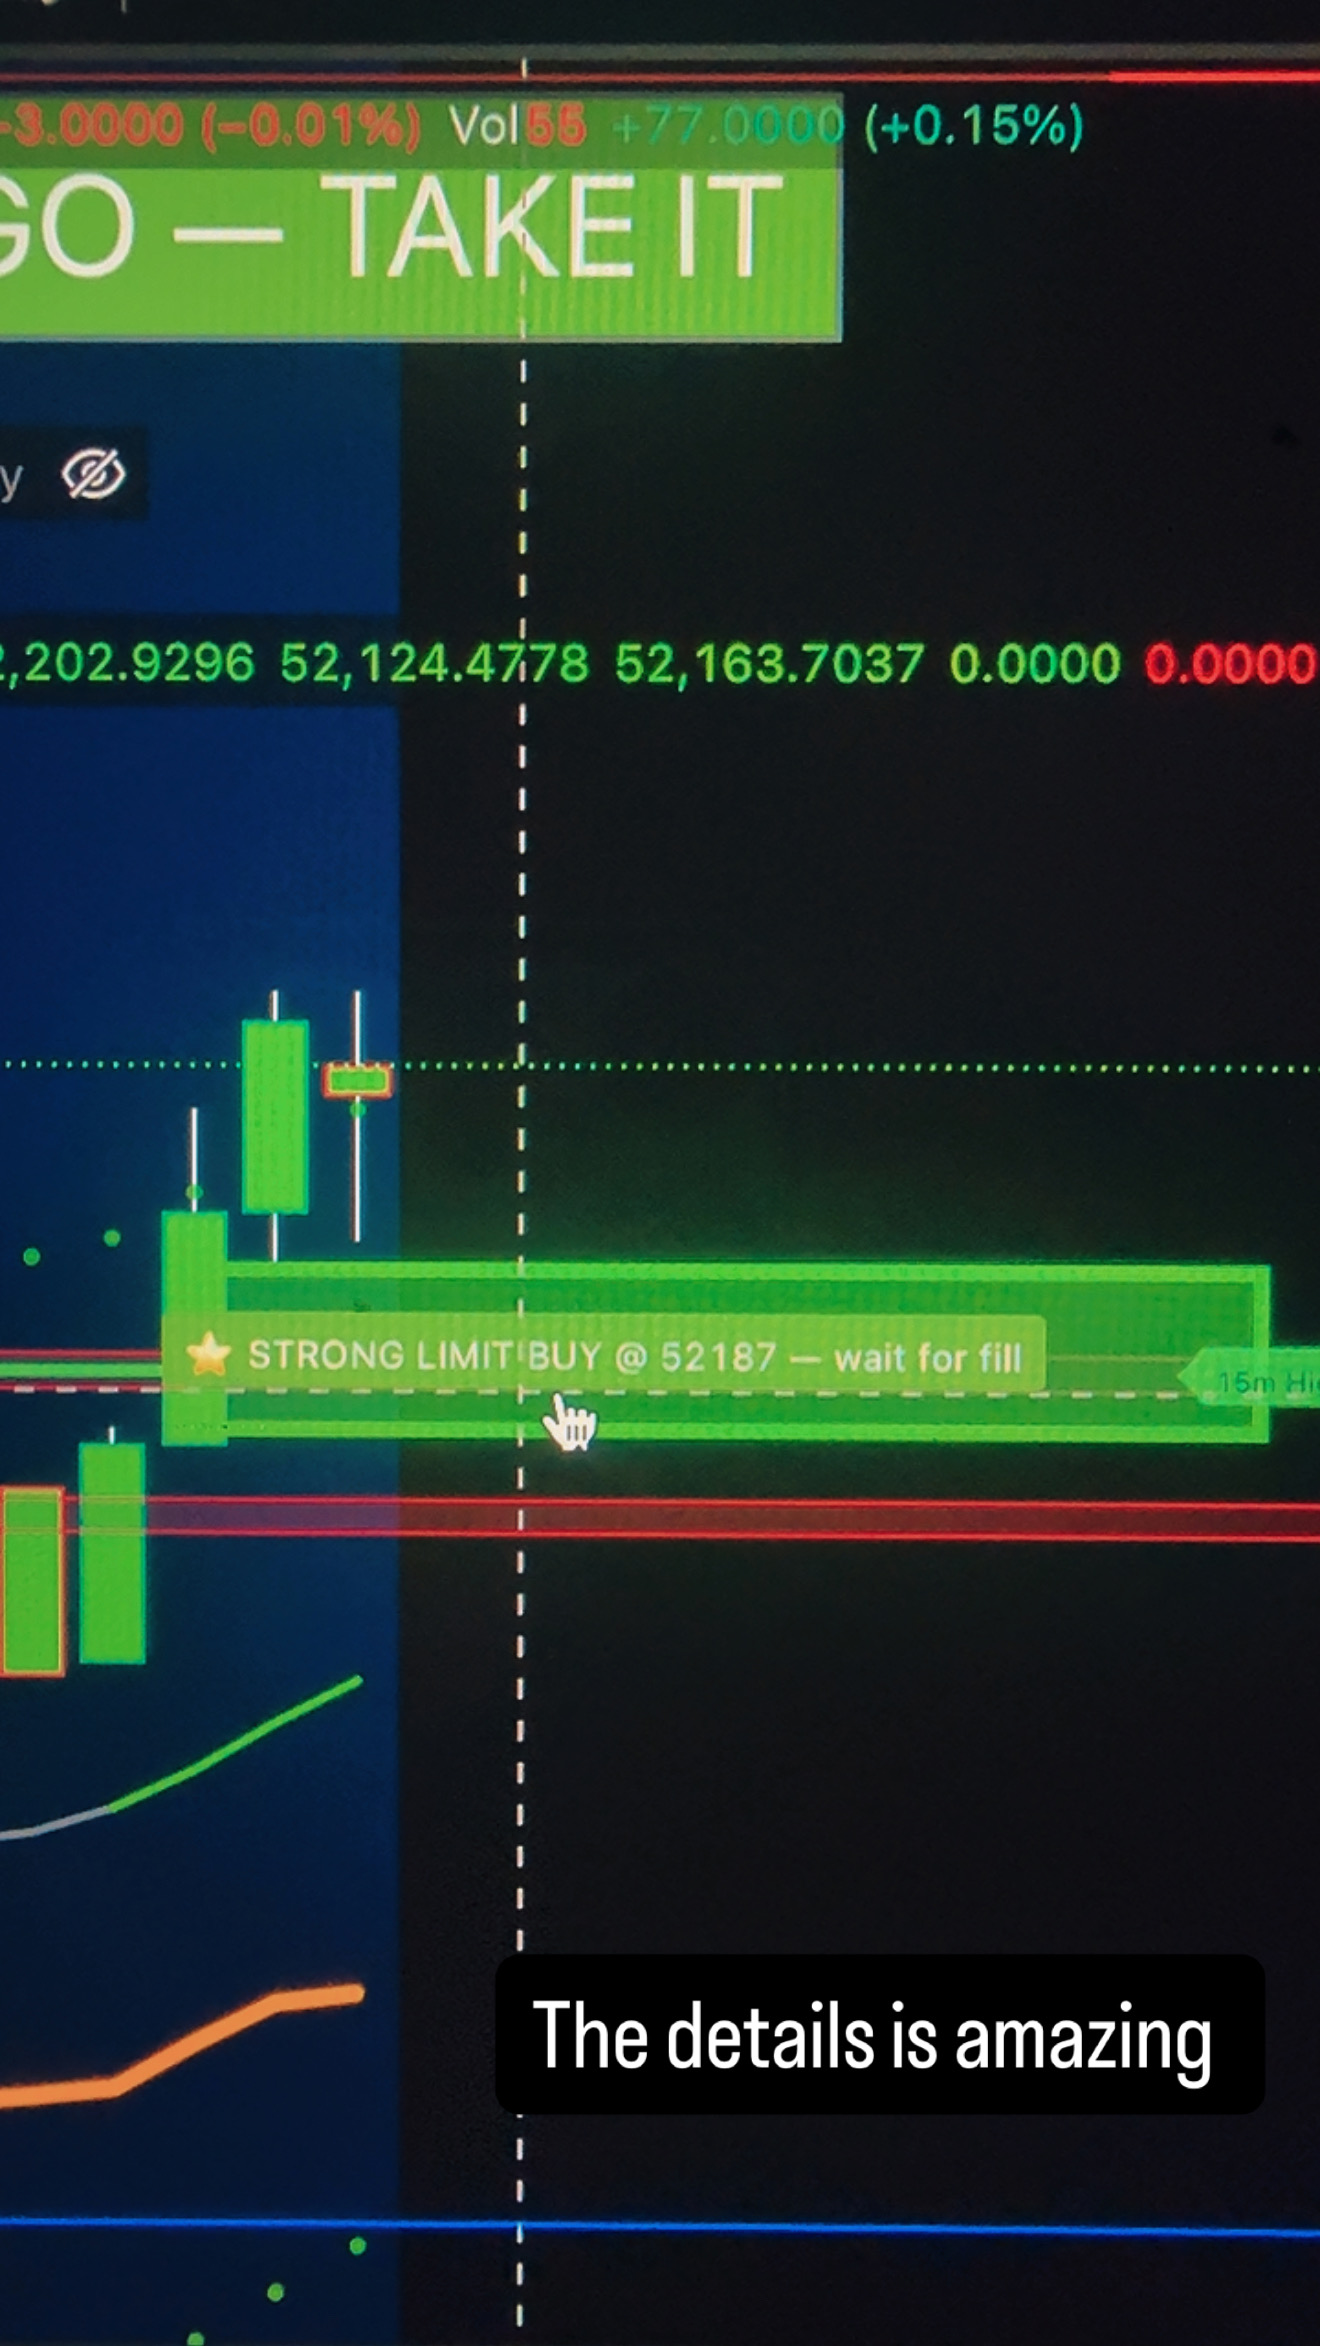
GLS in action — the banner calls "GO — TAKE IT" and the limit waits for the fill
🟢 The whole thing
Every trade is the same 5 steps
Learn these and you know the system. The rest of this playbook just shows you how.
1
Which way
Is the market going up or down?
2
Get ready
A good trade is coming.
3
Go in
The green light says buy or sell now.
4
Hold
Stay in and let it grow.
5
Get out
Take your money. Stop for the day.
The 3 things
Trade the light
Only take a trade when the tool says go.
The 3 things
Small losses
Cut losers fast. Let winners run far.
The 3 things
Stop up
Hit your goal for the day? Close the laptop.
01
What to Trade
This tool is built for FUTURES. That's what it does best. Futures move a lot at the open and show real buying and selling, so every signal is sharp. Trade futures first.
🏆 The 4 best — futures (this is your main thing)
Name
What to type
When it's best
S&P 500
ES (or MES for small money)
9:30 in the morning (NY time)
Nasdaq
NQ (or MNQ for small money)
9:30 in the morning
Dow
YM (or MYM for small money)
9:30 in the morning
Gold
GC (or MGC for small money)
8:00 in the morning
These 4 futures are the best markets for this tool. They move a lot, lots of people trade them, and the tool sees the real buying and selling — so the green lights are clean and true. If you only ever trade these 4, you have everything you need.
💡
Small account or a funded challenge?Trade the little ones: MES · MNQ · MYM · MGC. Same exact trades, way less money at risk. This is the best place to start.
Why futures win
The tool's magic is the volume — it watches how many people are really buying and selling. Futures show the real number from the exchange, so the tool sees the truth. That's why futures give the sharpest, most honest signals. Stick with ES, NQ, YM, and Gold.
Forex (only if you want extra — futures come first)
Forex works too, but it's a side option, not the main event. Trade it at the London open (3:00 AM NY) or New York open (8:00 AM NY). Best pairs: EUR/USD (easiest), GBP/USD (bigger moves), USD/JPY (smooth), GBP/JPY (wild), AUD/USD.
⚠️
The catchForex does not show real volume like futures do, so the tool's best trick (the volume filter) is weaker there. On forex, watch the price and the yellow average-price line (the VWAP — the day's fair price) more. This is why futures are better. Trade futures.
Don't trade
Small, slow, dead stuff. Weird coins. Quiet night hours. If nothing is moving, there is no trade.
Best tip: pick ONE future and trade only that. Most beginners do great with MNQ or MYM. Learn one market well — that beats guessing at five.
02
Set Your Chart
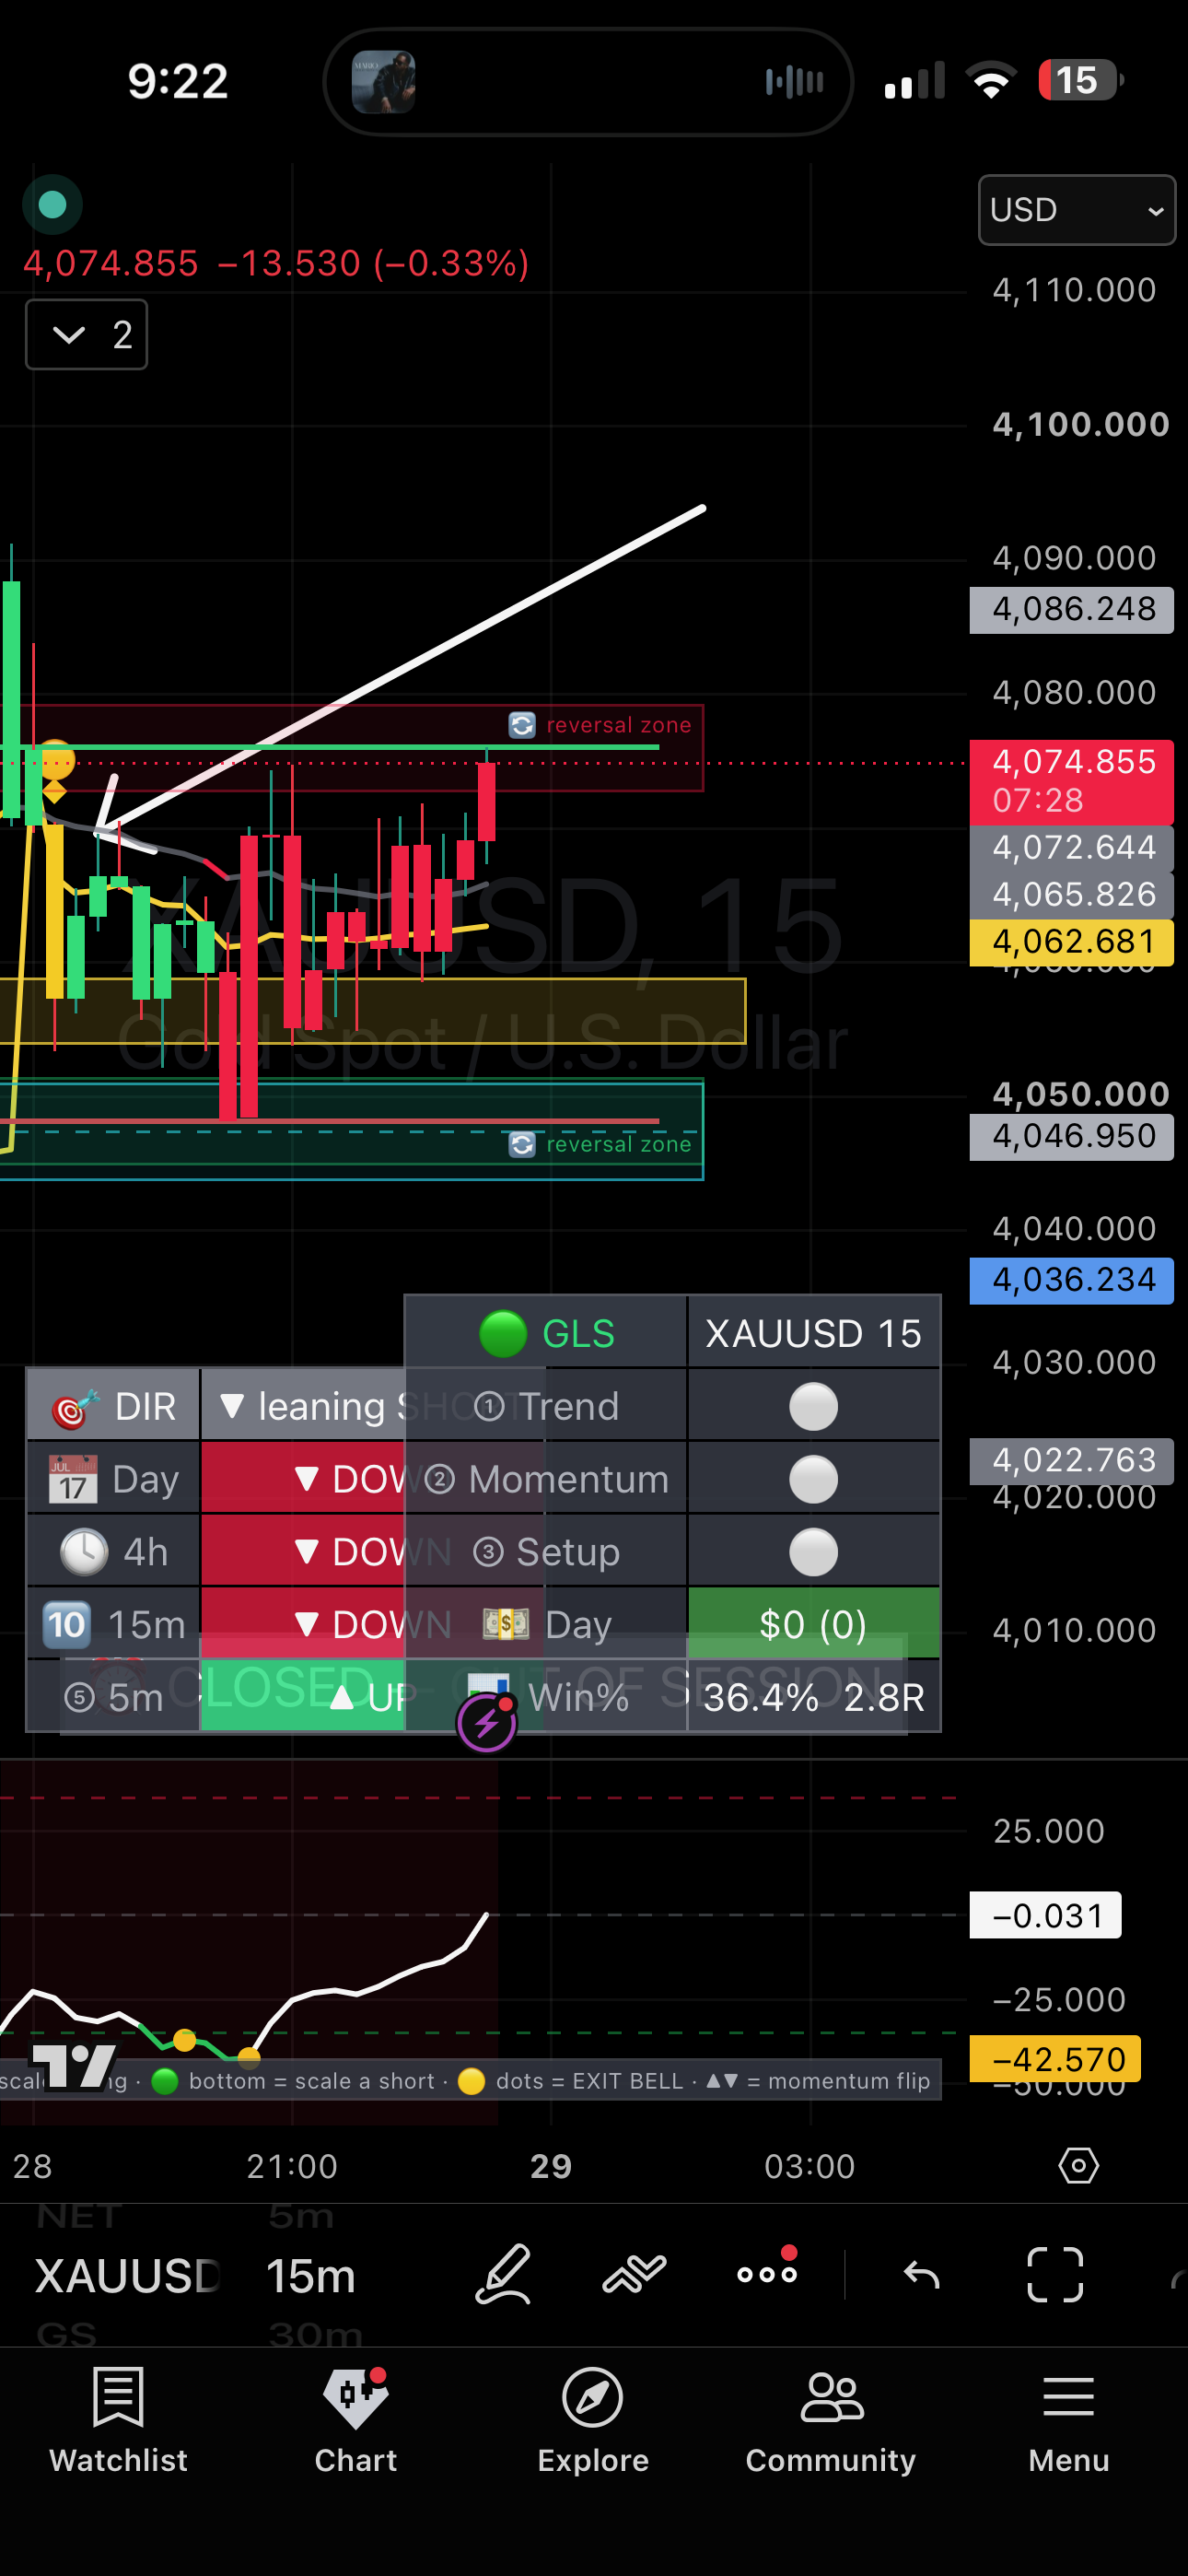
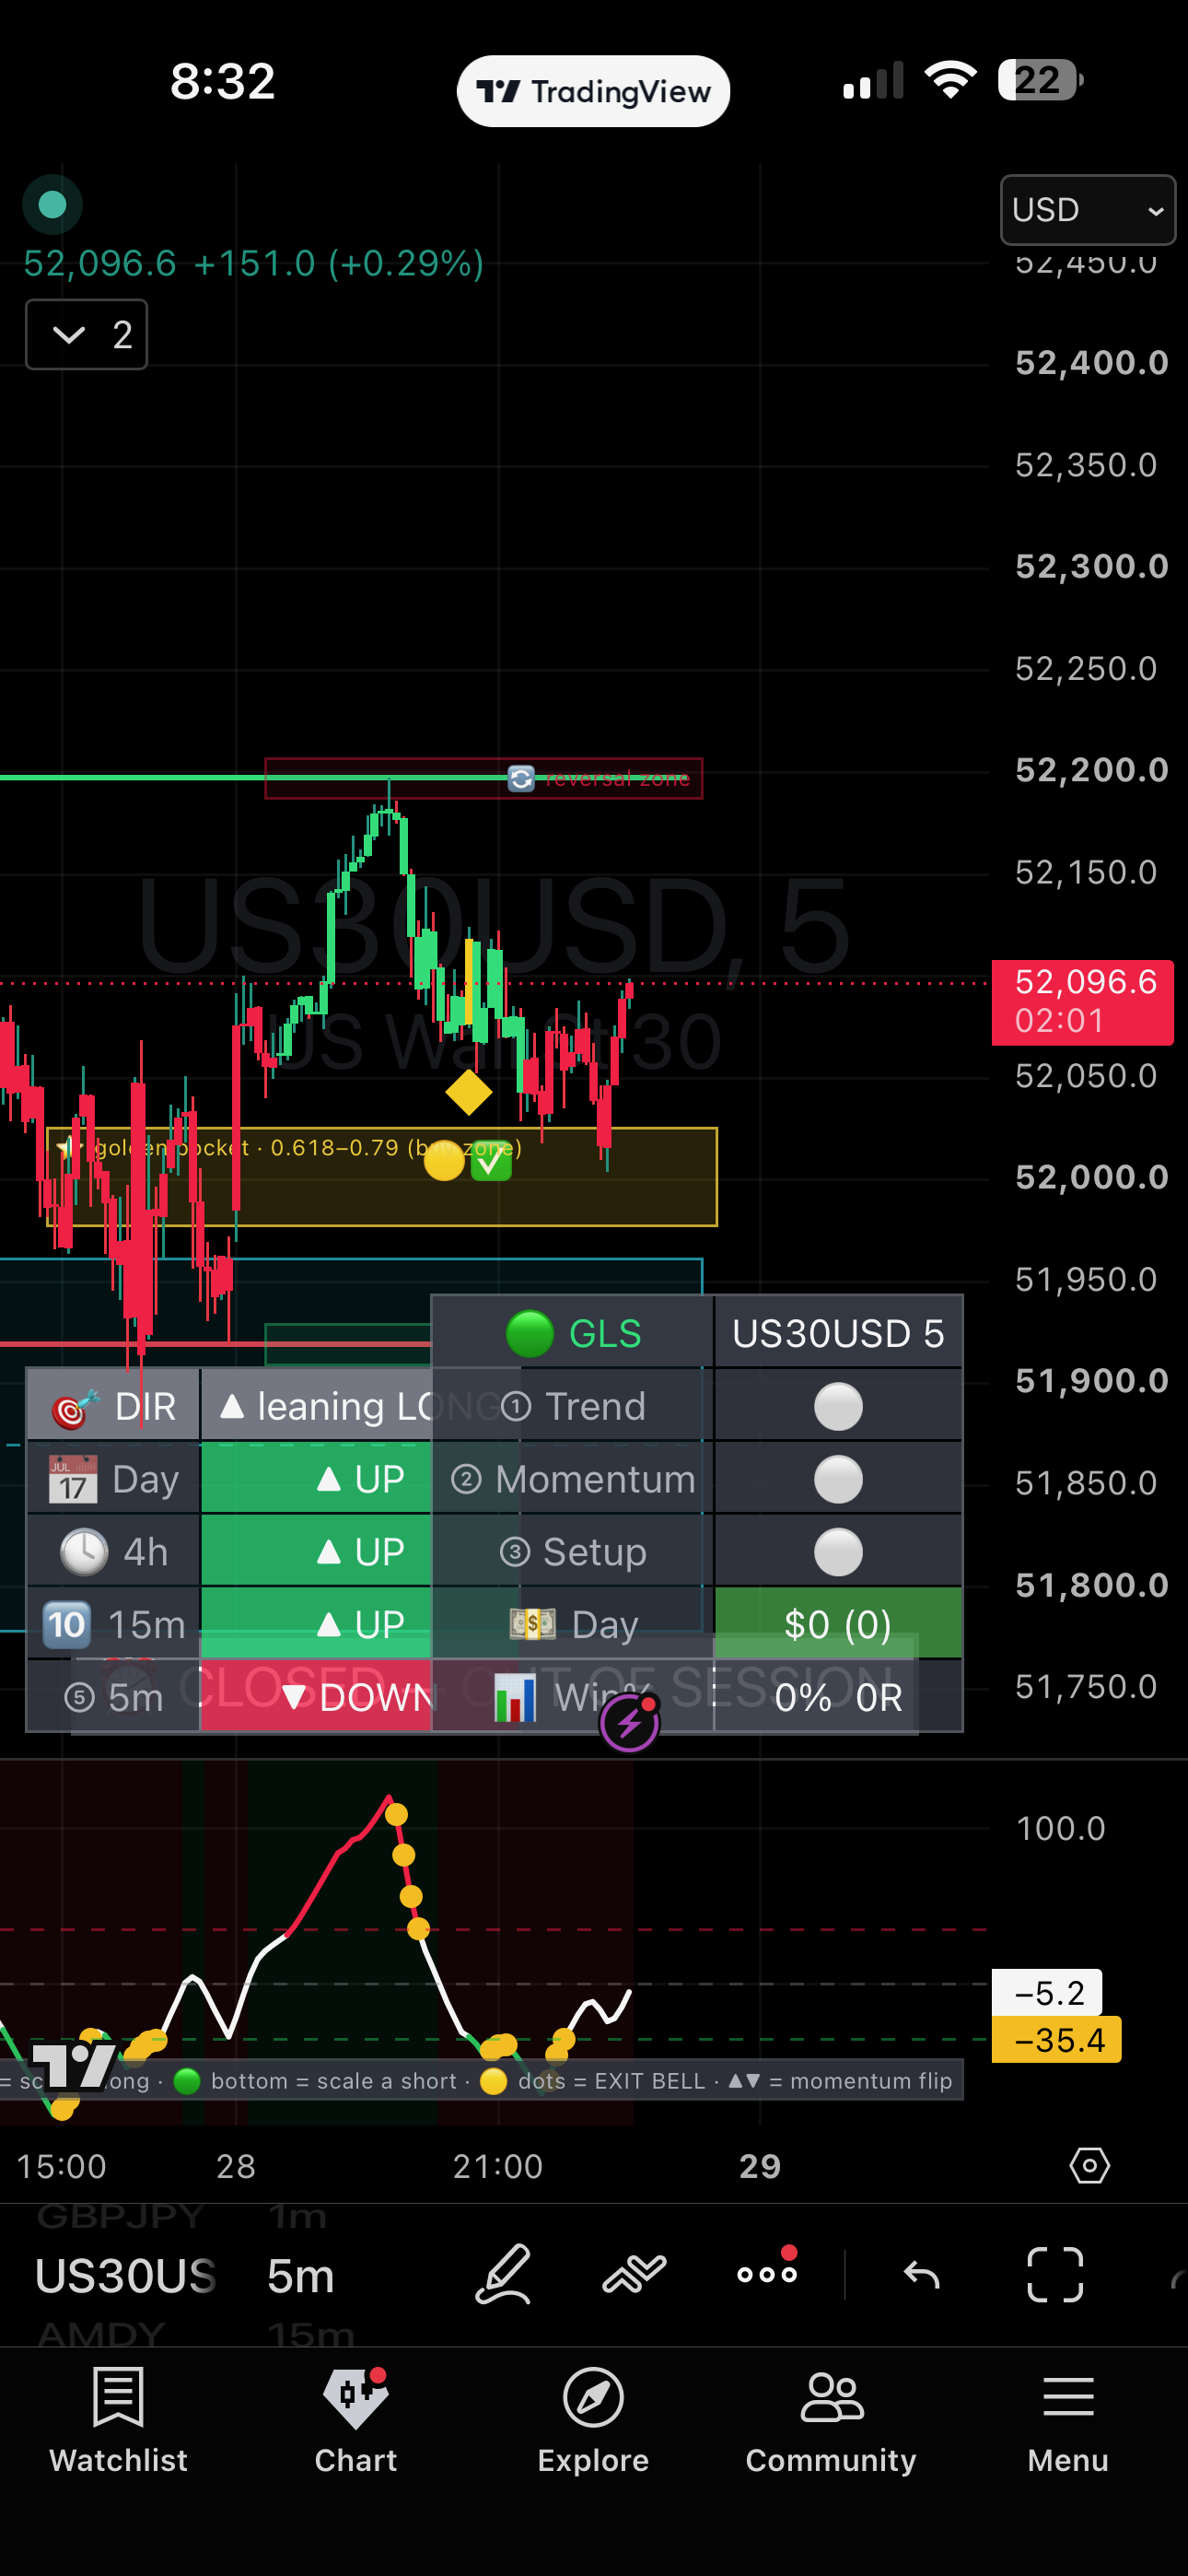
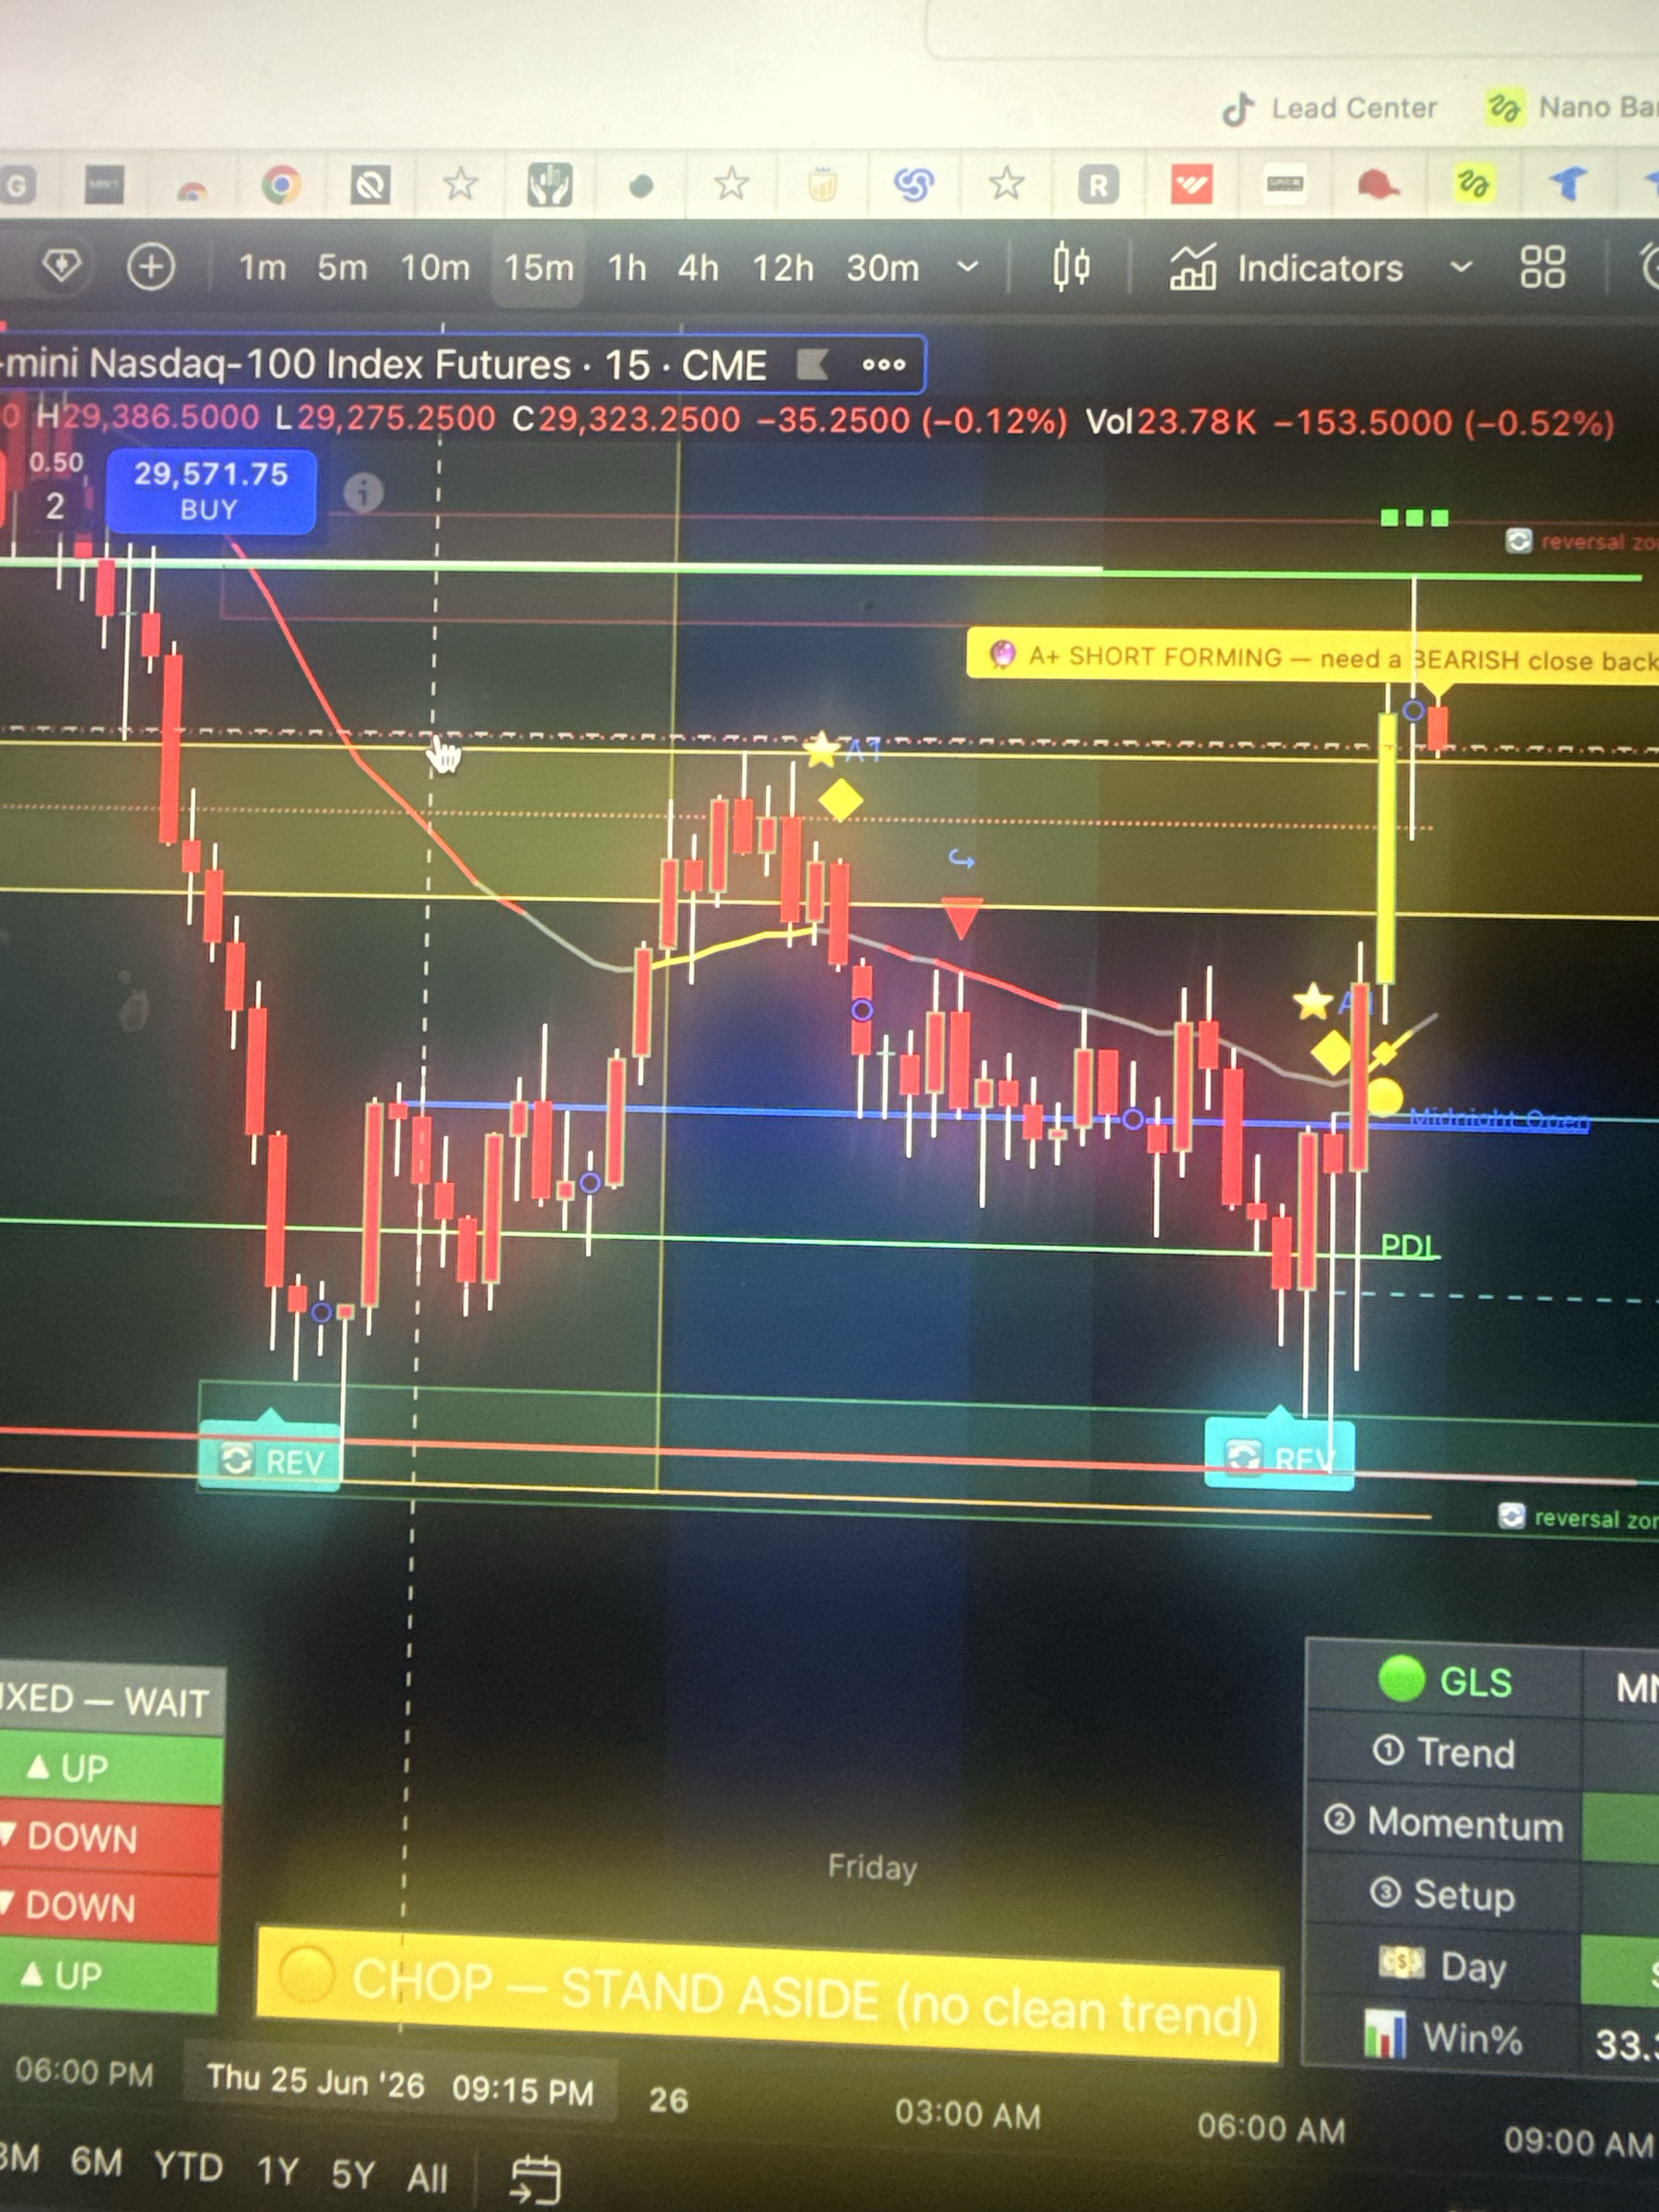
The dashboard — the 4 clocks (Day · 4h · 15m · 5m) each read UP or DOWN
Look at the bottom-left box on your chart. It shows 4 clocks: Day, 4h, 15m, 5m. Each one says UP or DOWN. (The box in the top-right corner is a different one — that's the Scalper's info panel.)
The rule is easy
All 4 say UP → it's a buy day. Only look to buy.
All 4 say DOWN → it's a sell day. Only look to sell.
Mixed (some up, some down) → do not trade. Wait.
💡
Mixed days are traps. The tool says "WAIT" so you don't lose money. That boring "wait" saves your account.
⏰ Two charts, two jobs (important — don't skip it)
Different trades work best on different charts. It's easy:
For this trade
Use this chart
The Opening trade (the big morning one)
15-minute (10 or 30 also work)
All day — the scalper and dip trades
5-minute
So: start your morning on the 15-minute to catch the opening. After the open, drop to the 5-minute for the rest of the day. Same tool. Same market. You just change the timeframe. That's it.
🕐
For the all-day trades (scalper, boxes, dips, switches), 5-minute or 15-minute both work. 5-minute gives you more trades, 15-minute gives you cleaner ones. Pick one and stick with it.
What "style" to pick
Go to Settings and pick your style. This sets how long you hold:
Your style
Best for
Day Trading (start here)
in and out, same day
1-Hour Swing
holding a few hours (use a 1-hour chart)
Multi-Day Swing
holding for days (use a 4-hour or Daily chart)
⚠️
If you pick "Multi-Day Swing" but stay on a small chart, the screen looks empty. That's not broken — the chart just has to match the style. Most people: Day Trading, and swap between the 15-minute and 5-minute like the box above says.
03
Read the Banner
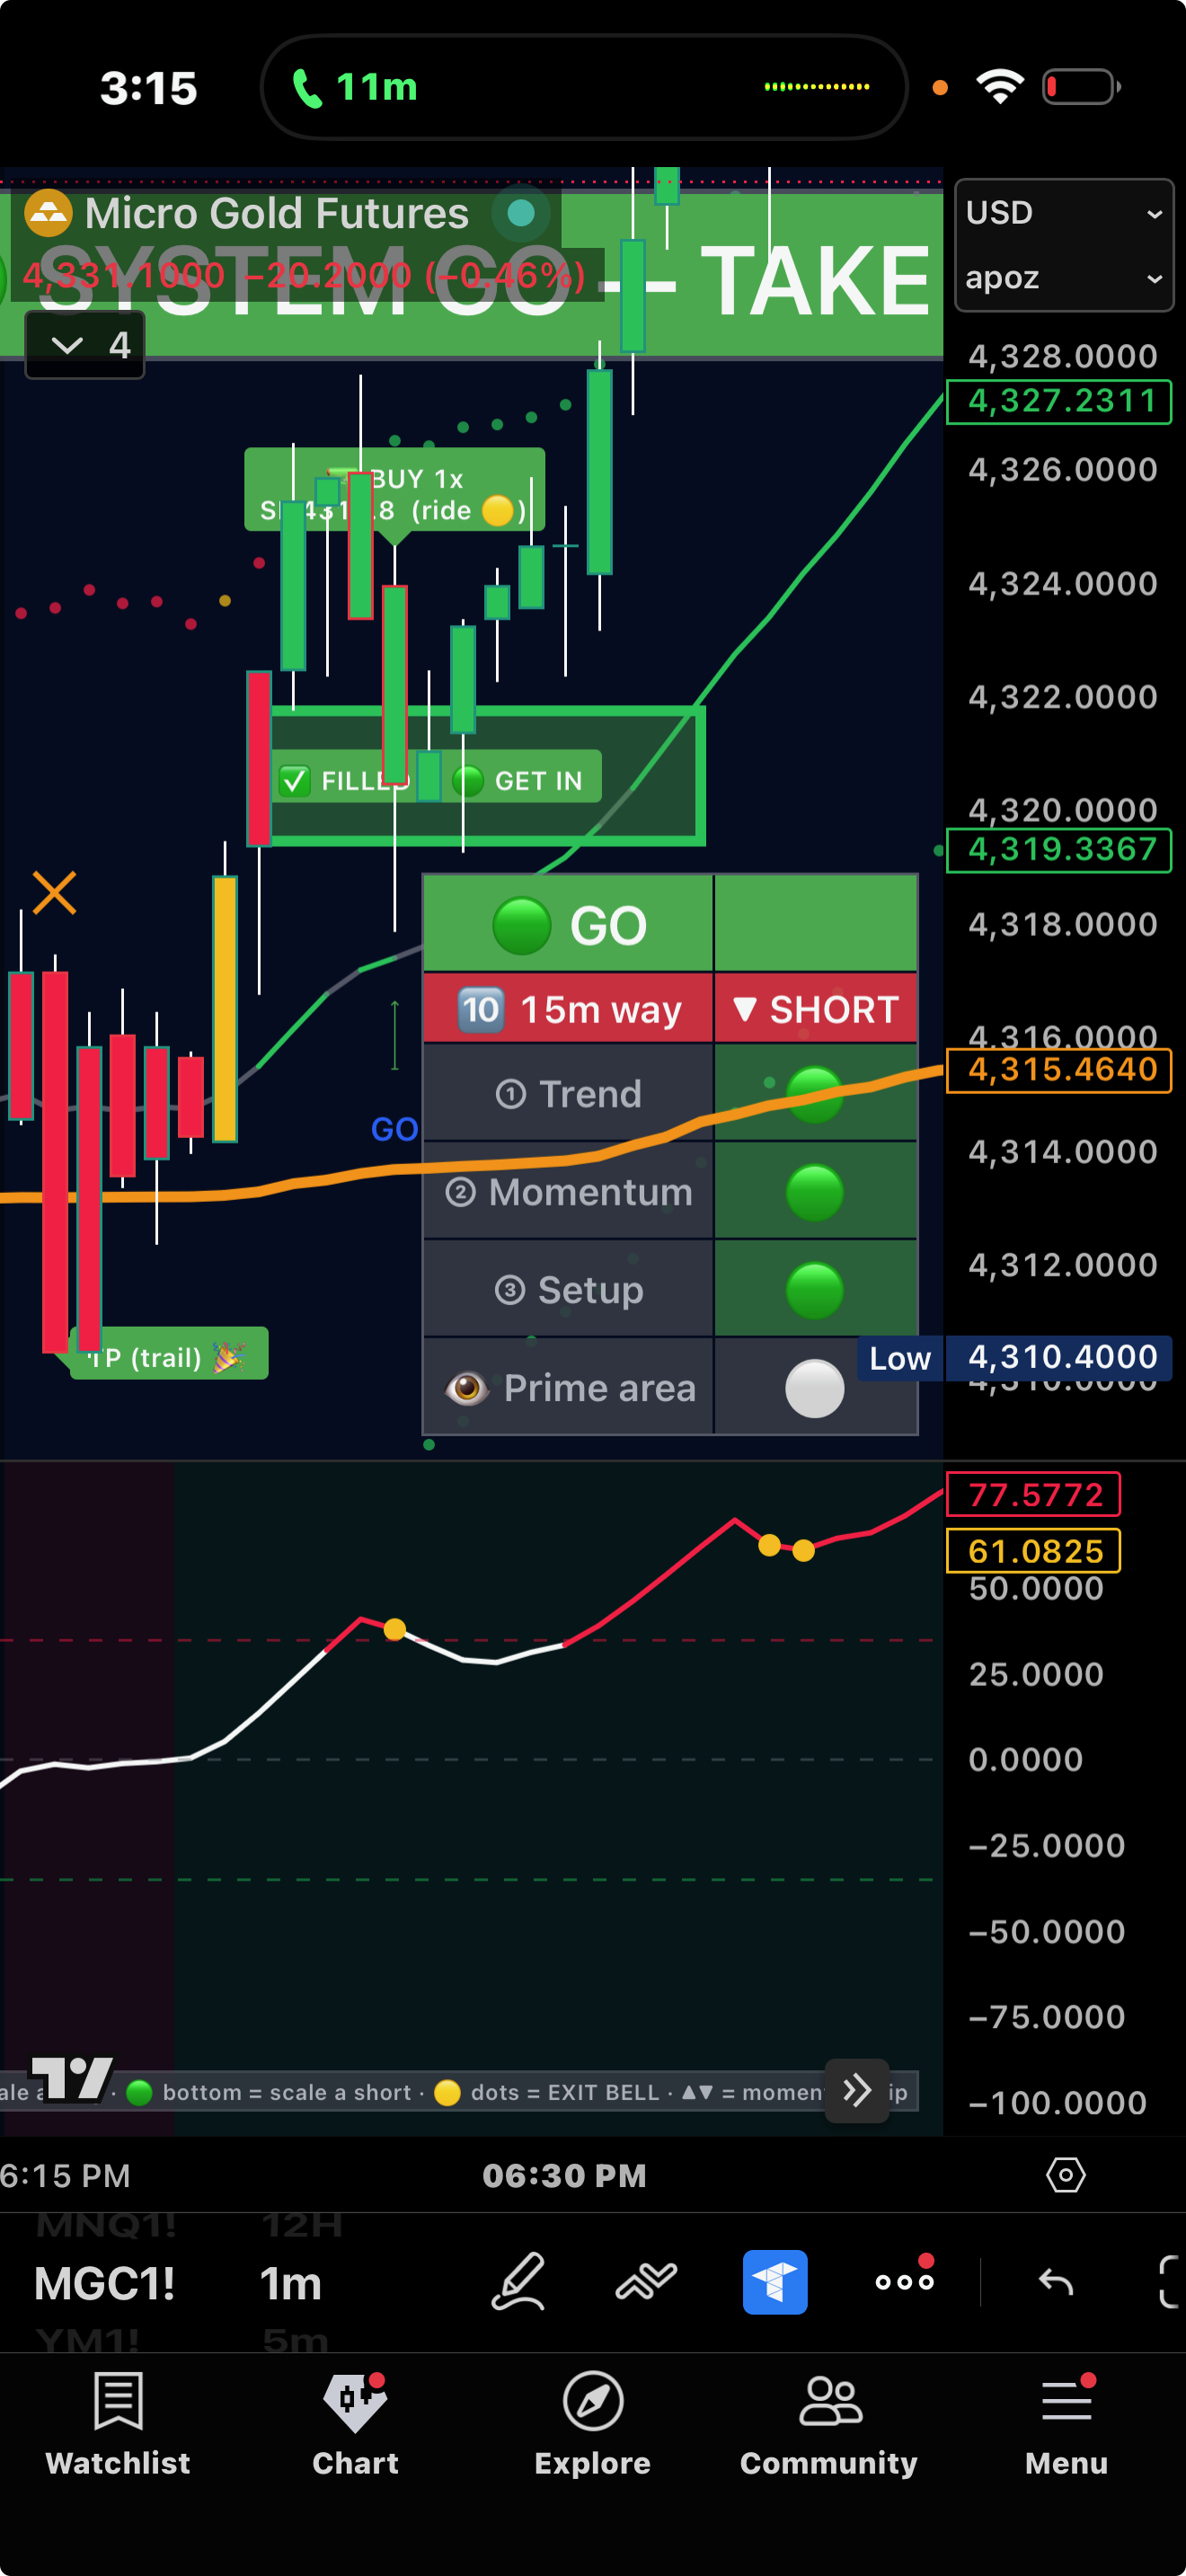
The banner talks to you in plain words — here it says "SYSTEM GO"
The tool talks to you in plain words in the middle of the screen. Just read it and do what it says.
It says
What it means
You do
🔮 GET READY
a trade is coming
watch, don't touch
🟢 SYSTEM GO
all set, go now
buy or sell
🟢 RIDE IT
you are in
hold on
🚀 RUNNER
you are winning big
let it keep going
🛑 STAND DOWN
you're done for the day
close the laptop
🟡 STAND ASIDE / WAIT
no good trade right now
wait
That's the whole job. Read the words. Do what they say. It only says "GO" when the setup meets the rules — but remember, no signal wins every time. Some will still lose, and that's normal.
🗒️
NoteNo matter which trade you take, you manage it the same easy way — keep your dotted stop, and take money at the gold dot (both coming up next).
🚦
The banner is the final wordThree green lights alone is not a green light — wait for the banner to say SYSTEM GO.
04
The 5 Ways to Win (+ a bonus)
There are 5 main ways to win, plus a bonus. You do not need all of them. Pick ONE. Get good at it. Then add another. Every way only trades with the 4 clocks — never against them.
Way
Name
Best chart
1
The Open (🔔 OPENING GO)
15-minute
2
The Scalper (⚡ Breakaway)
5-minute
3
The Get-In Box (📦 FVG)
5 or 15-minute
4
The A1 Dip (⭐ A1 gold box)
15-minute (or 5)
5
The Switch (↑ / ↓ SWITCH)
15-minute (or 5)
Bonus
The Simple ORB (🚀)
15-minute
💰 Way 1 — The Open (the big one)
The Open — the tool waits out the fake and calls the real move
The first 90 minutes after the market opens is the best time to trade. But it's tricky — the market often fakes one way first to trick people, then goes the real way. The tool waits out the trick and catches the real move. Here's what you do:
Don't trade the first 15 minutes. Just watch. (The tool measures those first 15 minutes to draw its range. Don't confuse that with the 90-minute window — one is the range it measures, one is the best time to trade.)
The tool waits for a real move (a strong candle, with lots of buying/selling).
When it's real → it says 🔔 OPENING GO — BUY (or SELL). It draws your stop line for you.
If it's a fake → nothing happens. The screen stays quiet.
🔔
Best charts for the Opening GoThe OPENING GO shows up best on the 10-, 15-, and 30-minute charts. 15-minute = the sweet spot (it matches the tool's opening range — use this one first). 10-minute gets you in a touch sooner; 30-minute is slower and steadier with fewer fakes. Let the first candle build, and when 🔔 OPENING GO prints, take it on the close of that candle. Stop on the dotted line. One clean trade.
⚙️
Two modesIn Settings, the Opening has a switch called "How it calls direction." Leave it on "Volume Breakout" (go WITH the real move). The other choice, "Sweep-Reclaim Fade," flips it to bet the other way — advanced only. Beginners: leave it on Volume Breakout.
💰 Way 2 — The Scalper (quick trades, all day)
The Scalper: range → break → limit at the retest → TP at 1:1, stop to breakeven.
This one is already on. When price gets tight and squeezed, then pops out, the tool tells you to place an order at a good price. On the chart you'll see a Limit Buy or Limit Sell box and a line — that line is your price.
BUY → price popped up. Place a buy at the line. Buy the little dip back.
SELL → price popped down. Place a sell at the line. Sell the little bounce up.
You place a limit order at that line, so you get a good price instead of chasing. When it fills you'll see "Long Filled" / "SHOTS FIRED."
⏰ Best timeframe for the Scalper
The scalper works best on the 5-minute chart. It runs all day. This is your main all-day trade after the open.
How to trade it (step by step)
Stay on the 5-minute chart, with the trend (the 4 clocks agree).
Wait for price to get tight and squeezed, then pop out.
The tool shows a Limit Buy / Limit Sell line. Place your limit order right there.
Buy → buy the little dip back. Sell → sell the little bounce.
Stop: the line the tool draws. First target: the 🎯 line. Take half, then ride the 🏄 8-EMA.
⚙️ Best settings for the scalper (most come already set — but check Max range height)
Chart on 5-minute
Strong-trend only: ON (already on)
Scalp with intraday trend: OFF (already off)
Max range height: change it from 4 to 2 (only tight, clean squeezes)
Catch-the-runner: OFF (already off)
💰 Way 3 — The Get-In Box (the core trade)
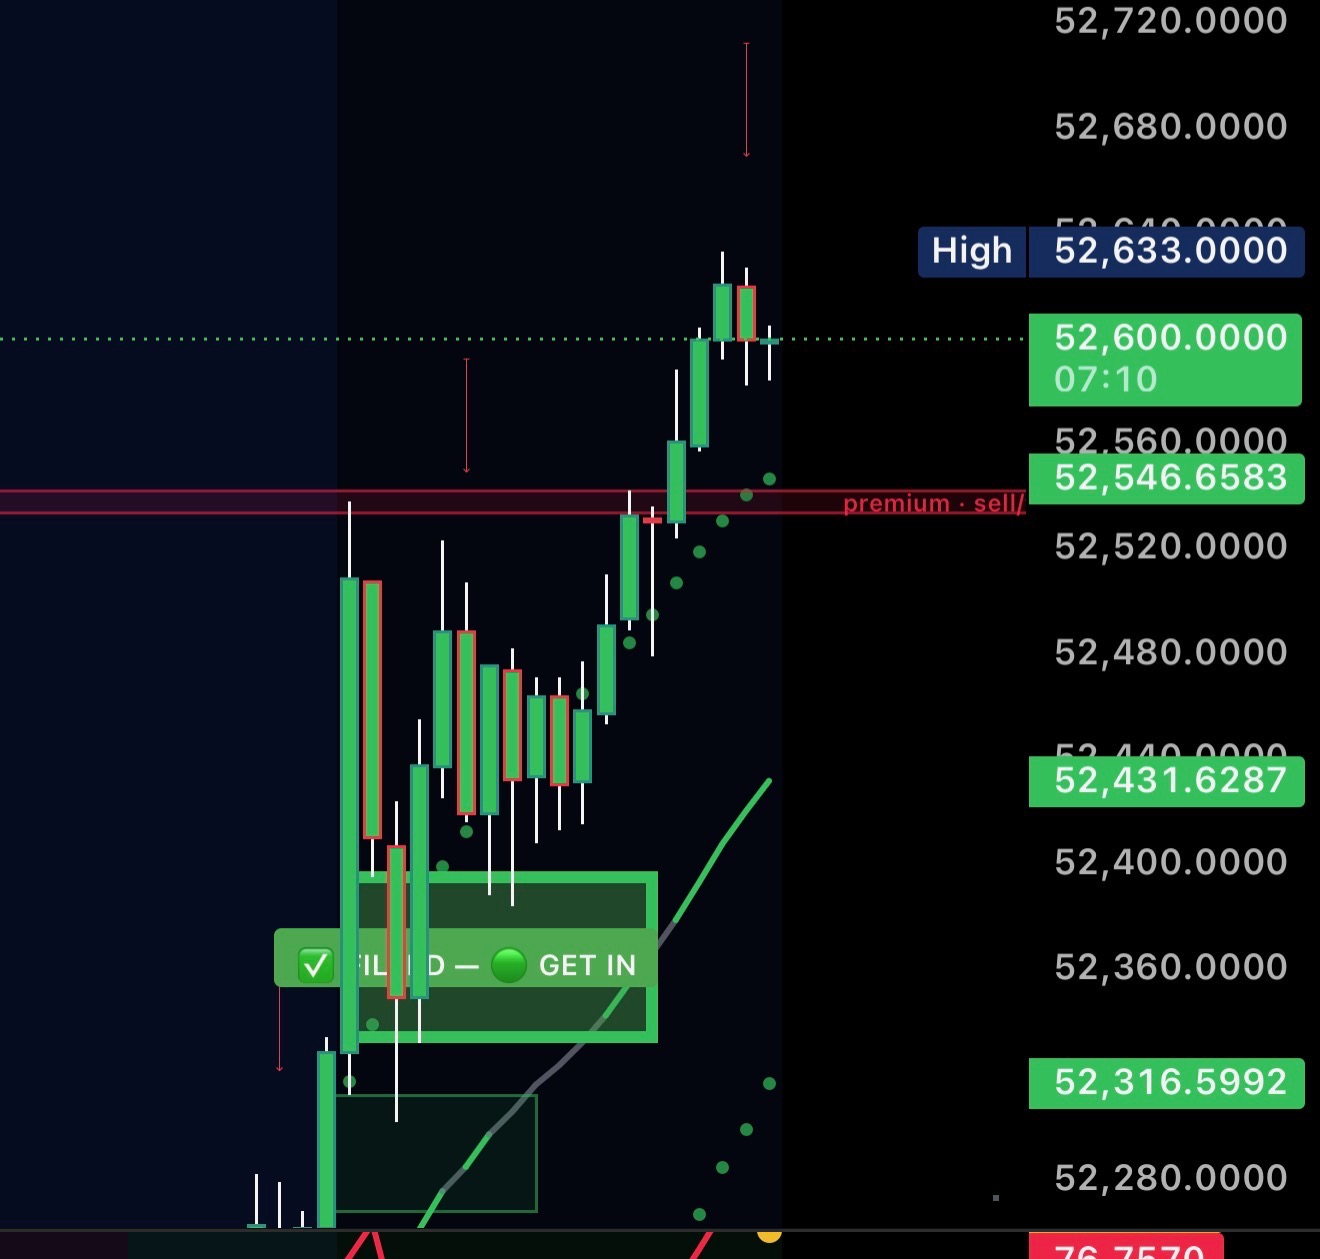
The Get-In Box — the gap flips to "✅ FILLED — GET IN" as price tags it
This is the trade the tool is built around. You'll see it a lot, so learn it well. When price moves fast, it leaves a little gap — a spot it skipped over. (Traders call this an FVG, a "fair value gap" — that's all FVG means.) Price likes to come back and "fill" that gap before it keeps going. The tool draws a green box (for buys) or red box (for sells) on that gap. That box is your GET-IN spot.
⏰ Best timeframes for the Get-In Box
The GET-IN box works on the 5-minute and 15-minute charts.
5-minute = you get lots of boxes all day. Best for active trading. This is the main one for the all-day part of your session.
15-minute = fewer boxes, but bigger and cleaner. Best if you want fewer, stronger trades.
Use it on whatever chart you're already on for the day.
How to trade it (step by step)
Check the 4 clocks agree (up for a green box, down for a red box). No trend = skip it.
A green box shows up under price in an up-trend (or a red box above price in a down-trend).
Wait for price to come back and touch the box. The tool says ✅ FILLED — GET IN.
Enter there. You got a great price — right where big money steps in.
Stop: the dotted 🛑 line the tool draws (just past the box).
First target: the 🎯 line the tool draws. Take half, then ride the trend with the 🏄 8-EMA for more.
🟢
Only take the box that goes with the 4 clocks. If a box breaks and fails, the tool grays it out — skip gray boxes. (The tool only draws boxes that go with the trend, so you won't get bad-direction ones unless you turn on the extra "show ignored zones" switch.)
💰 Way 4 — The A1 Trade (buy the dip in the gold box)
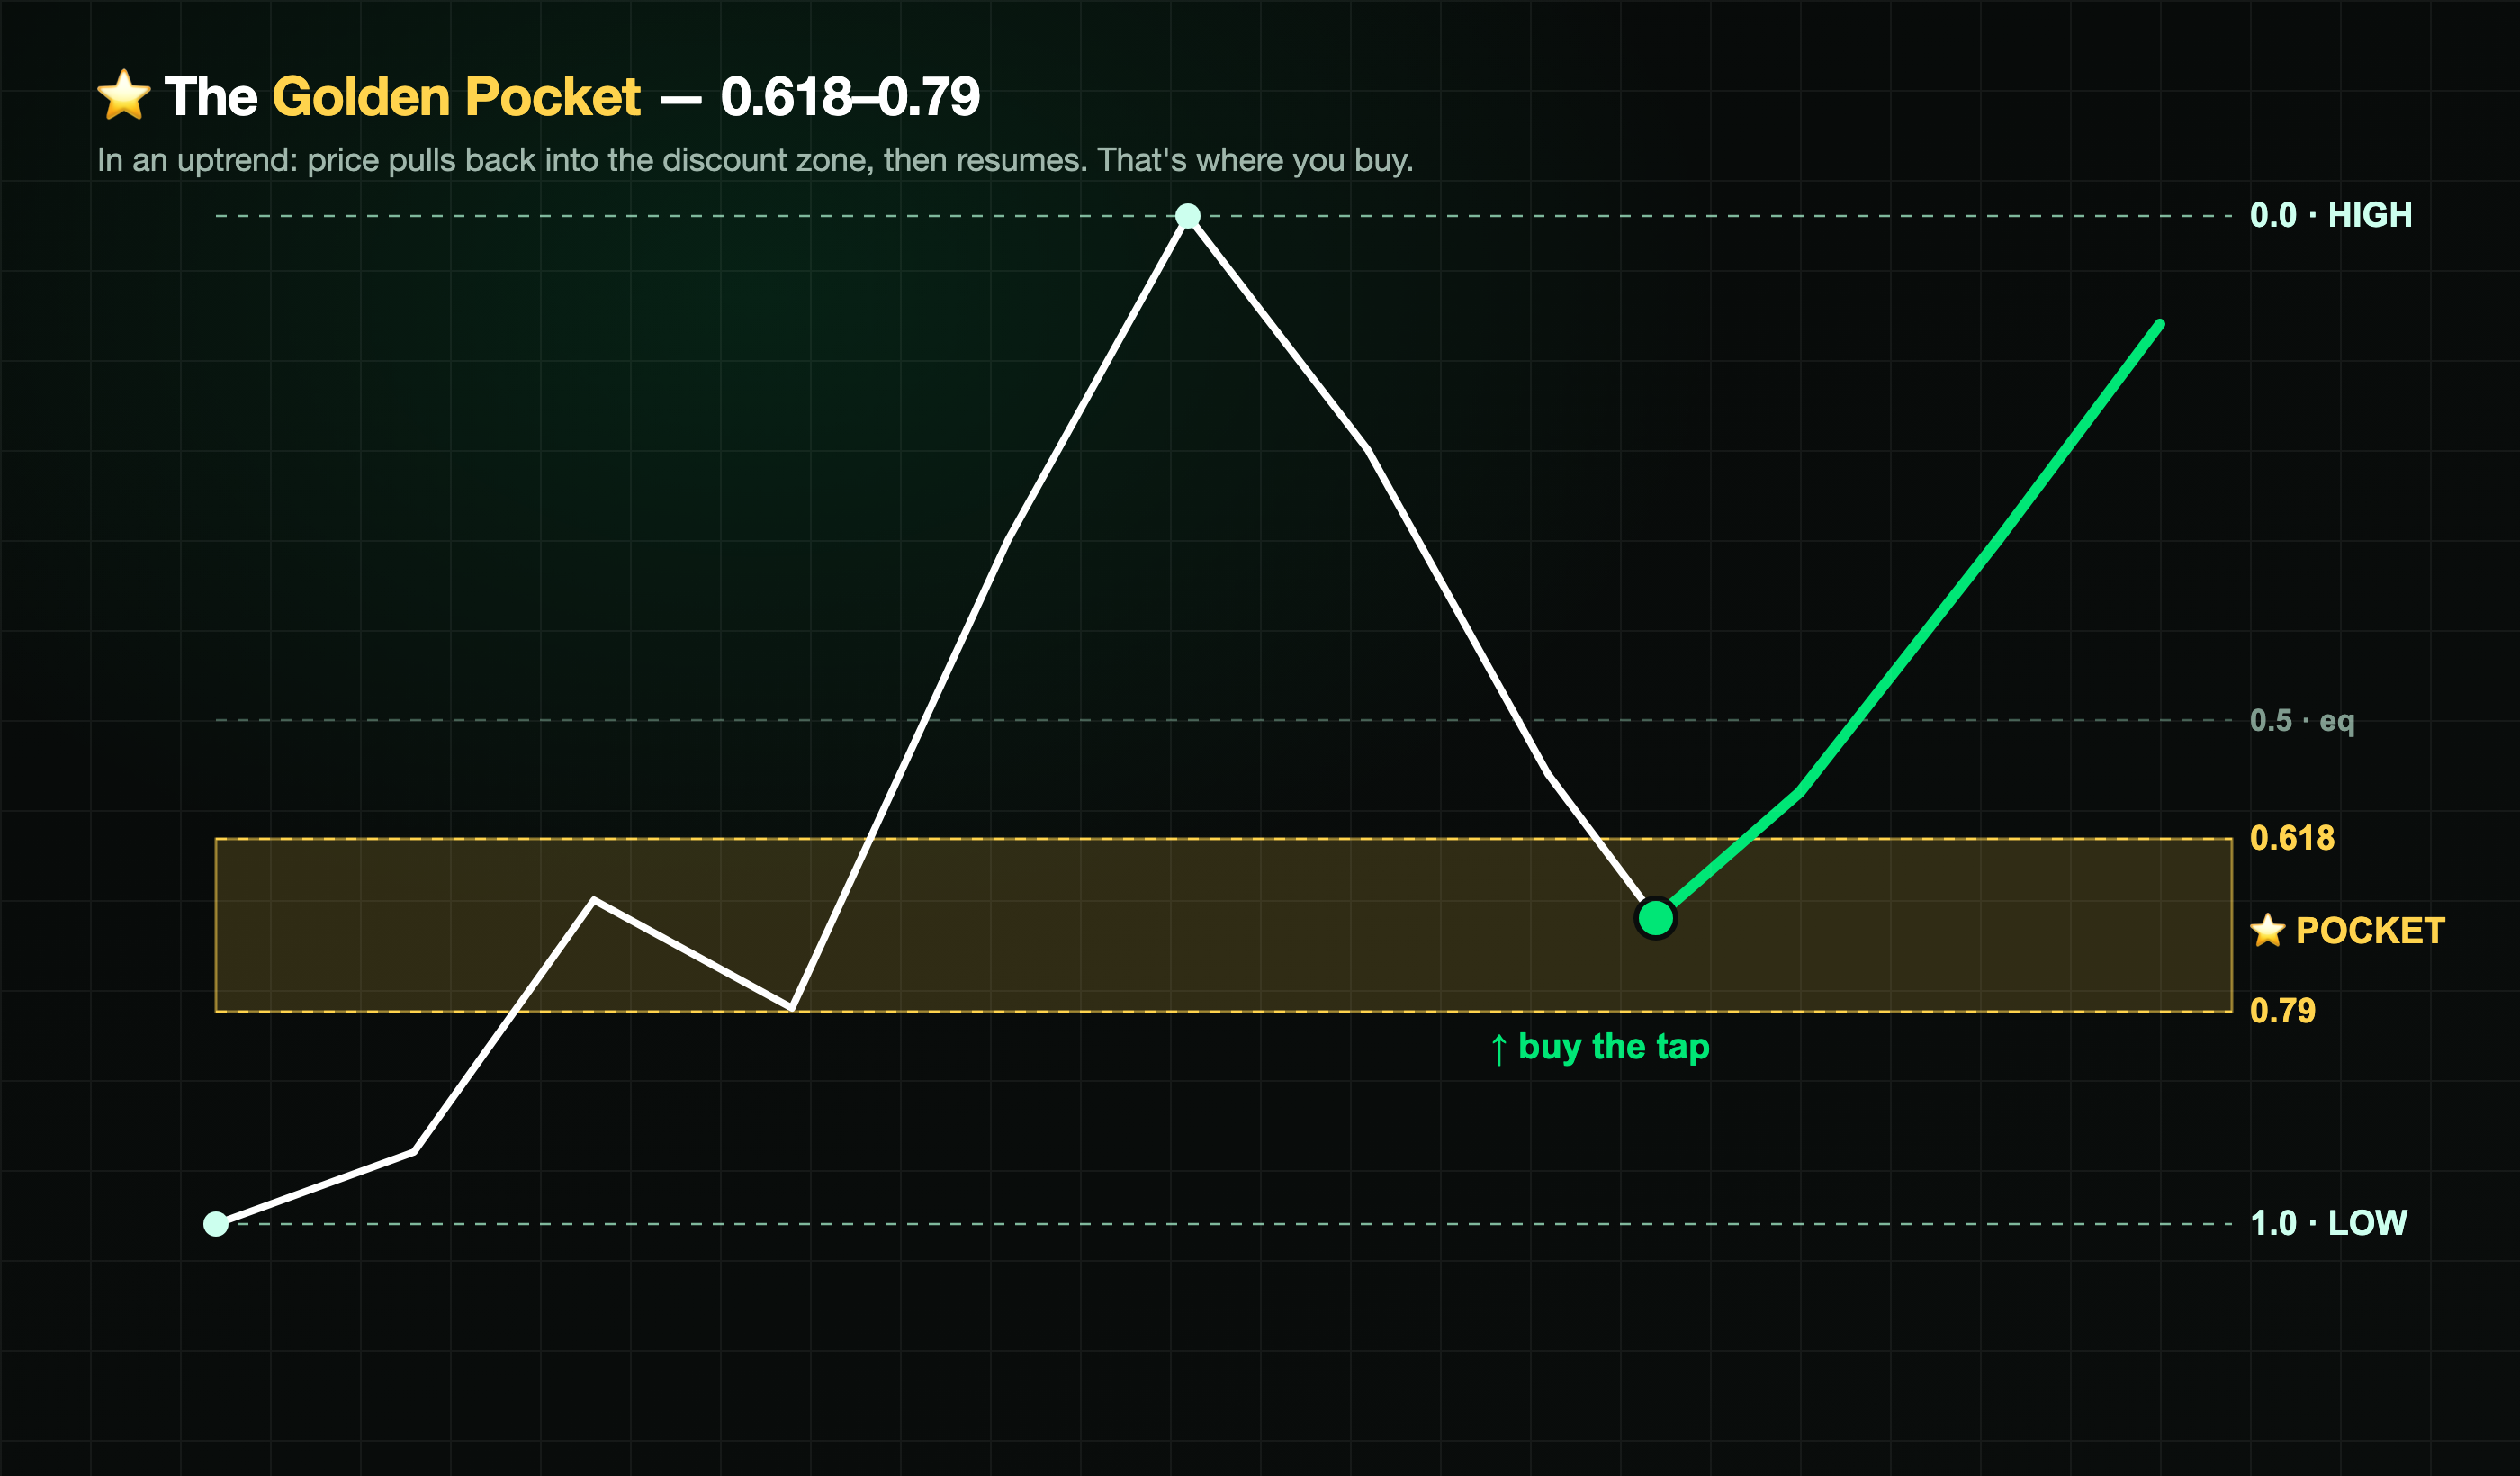
The A1 Trade — price dips into the gold box (the golden pocket) then resumes the trend
This is the ⭐ A1 trade — one of the best setups in the whole tool. "A1" just means A-plus, top grade. When the trend is strong and price dips back a little, it often stops in a special spot called the golden pocket — the tool draws it as a gold box. Buying the dip there means you join a strong trend at a discount price.
Why it's so good: you're not guessing. You wait for a strong trend, wait for the dip into the gold box, and wait for the tool to say the dip is done. Three green lights before you risk a dime.
⏰ Best timeframes for the A1 trade
The A1 works best on the 5-minute and 15-minute charts.
15-minute = the best one. The gold box is bigger and cleaner. Fewer, stronger A1 trades. Start here.
5-minute = more A1 trades, a bit smaller. Good once you know the setup.
Keep it on the same chart you're already using for the day.
How to trade the A1 (step by step)
Check the trend. The 4 clocks must agree (all up for a buy, all down for a sell). No trend = no A1.
Price dips back into the gold box (the golden pocket). The banner says GET READY.
A 🎯 shaded band shows up — that's the exact "get-in zone" to watch.
Wait for the ⭐ star (⭐ A1). The tool needs a strong candle to close back the right way. The star means "the dip is done, go now." Do NOT buy just because price touched the box — wait for the star.
Get in when the ⭐ A1 prints.
Stop: just past the far side of the gold box.
First target: the last high (for a buy) or last low (for a sell). Take half. Then ride the trend with the 🏄 8-EMA line.
⚠️
This only works with the trend. The tool skips dips that go against the trend — those are traps. The ⭐ A1 star is your proof the dip is really over.
💰 Way 5 — The Switch (catch the turn)
The Switch — the Yellow Man warns first, then the arrow confirms the real turn
Sometimes the trend flips. Down turns into up. Up turns into down. The Switch trade catches that turn early, so you're in before the crowd. The tool warns you first, then tells you when the flip is real.
The two steps of a Switch
First you see a 🟡 Yellow Man — a yellow candle. That's a warning: the trend might be turning. (This is NOT a trade yet. Just get ready and watch.)
Then, when the turn is real, a big arrow prints: ↑ SWITCH (turned up) or ↓ SWITCH (turned down). That arrow is your green light.
⏰ Best timeframes for the Switch
The Switch works best on the 5-minute and 15-minute charts.
5-minute = catches the turn fast — best for quick reversal scalps. More signals, a little more noise.
15-minute = cleaner, bigger turns. Fewer signals, but stronger ones. Best if you want to hold longer.
Don't use it below the 5-minute — a 1-minute chart flips too much and fakes you out.
Simple: use the 5-minute for a quick catch, the 15-minute for a bigger, safer turn. Beginners: start on the 15-minute — the Switches there are the trustworthy ones.
How to trade the Switch (step by step)
Wait for the 🟡 Yellow Man warning. Get ready. Don't trade yet.
Wait for the ↑ SWITCH (to buy) or ↓ SWITCH (to sell) arrow. This is your go.
Get in on the close of the switch candle.
Stop: just under the low of the switch candle (for a buy) — or just over the high (for a sell).
First target: the last swing high (for a buy) or last swing low (for a sell). Take half there.
Then ride the new trend with the 🏄 8-EMA line. Stay in while price holds it.
⭐ Extra-strong version: if a star shows up on a GET-IN box right after a SWITCH, that's a reversal and a get-in box lining up. Those are the best turn trades — you can trust them more and even size up a little.
🔔
ImportantThe Switch goes quiet during the opening window (the first ~45 minutes) on purpose, so it doesn't fight the 🔔 Opening call. In the morning, the Opening trade is the boss. The Switch takes over later in the day. So: trade the 🔔 Opening at the open, then watch for Switches the rest of the session.
🚀 Bonus — The Simple ORB
Way 1 (The Open) is the smart version. But if you want the plain, old-school open trade, the tool has it too. It's off to start.
Turn it on: Settings → ORB → flip Opening-Range Breakout: ON. ⚠️ Important: you also have to turn the Scalper OFF — if the Scalper is on, the ORB stays hidden.
How to trade it
When the market opens, the tool draws a box around the first 15 minutes (the high and low).
Wait. Don't trade inside the box.
A candle closes above the box → buy. A candle closes below → sell.
Stop: the other side of the box.
Target: as far as the box is tall, once or twice. Or ride it if it runs.
🟡
Be honestThis plain version gives more trades, but more of them are fakes. That's why Way 1 is smarter. Trade Way 1 first. Use the plain ORB later, once you can spot a fake.
Which switch turns on which way
So you're never lost in the Settings menu:
Way
Switch name in Settings
On to start?
Way 1 — The Open
🔔 Opening
✅ ON
Way 2 — The Scalper
⚡ Breakaway Scalper
✅ ON
Way 3 — The Get-In Box
📦 GET IN boxes
✅ ON
Way 4 — The A1 Dip
⭐ A+ Setup
✅ ON
Way 5 — The Switch
🟢 Reversal-switch arrows
✅ ON
Bonus — Simple ORB
🚀 Opening-Range Breakout
✗ OFF
✅
Good newsWays 1 through 5 are all already ON. You don't have to turn anything on to start.
05
The Helpers (extra things that help you win)
The helpers on a live chart — VWAP, painted candles, support/resistance, and zones all working together
These are not trades by themselves. They're helpers that make your trades better. They're already on. Here's what each one means when you see it:
You see
What it is
How it helps
🟡 Yellow Man
a yellow candle
warning: the trend may flip. Get ready.
🧭 LEAN LONG / SHORT
the day's lean
if no big GO fired yet, this is the day's bias. Context only, smaller size.
📊 VWAP (yellow line)
the day's fair price
buy above it, sell below it. A magnet and a target.
🏄 8 EMA line (thin)
your "stay in" line
while price holds it, stay in. When a candle closes through it, get out.
🛡 Green line (Support)
a floor price
price often bounces up off it. Take profit into it on a short.
🧱 Red line (Resistance)
a ceiling price
price often drops off it. Take profit into it on a long.
🟥 Supply/Demand box
where big money sits
buy at a demand box, sell at a supply box. The tool only shows the one that goes with the trend.
🎯 Shaded band
the pullback get-in zone
shows exactly where to wait for your dip entry.
🧩
Simple way to use themThe Ways tell you WHEN to get in. The helpers tell you WHERE the good and bad spots are. Use them together: take your GET-IN box or dip at support/demand/VWAP, and take profit into the next resistance or supply.
06
The OSOB — your "get out" tool
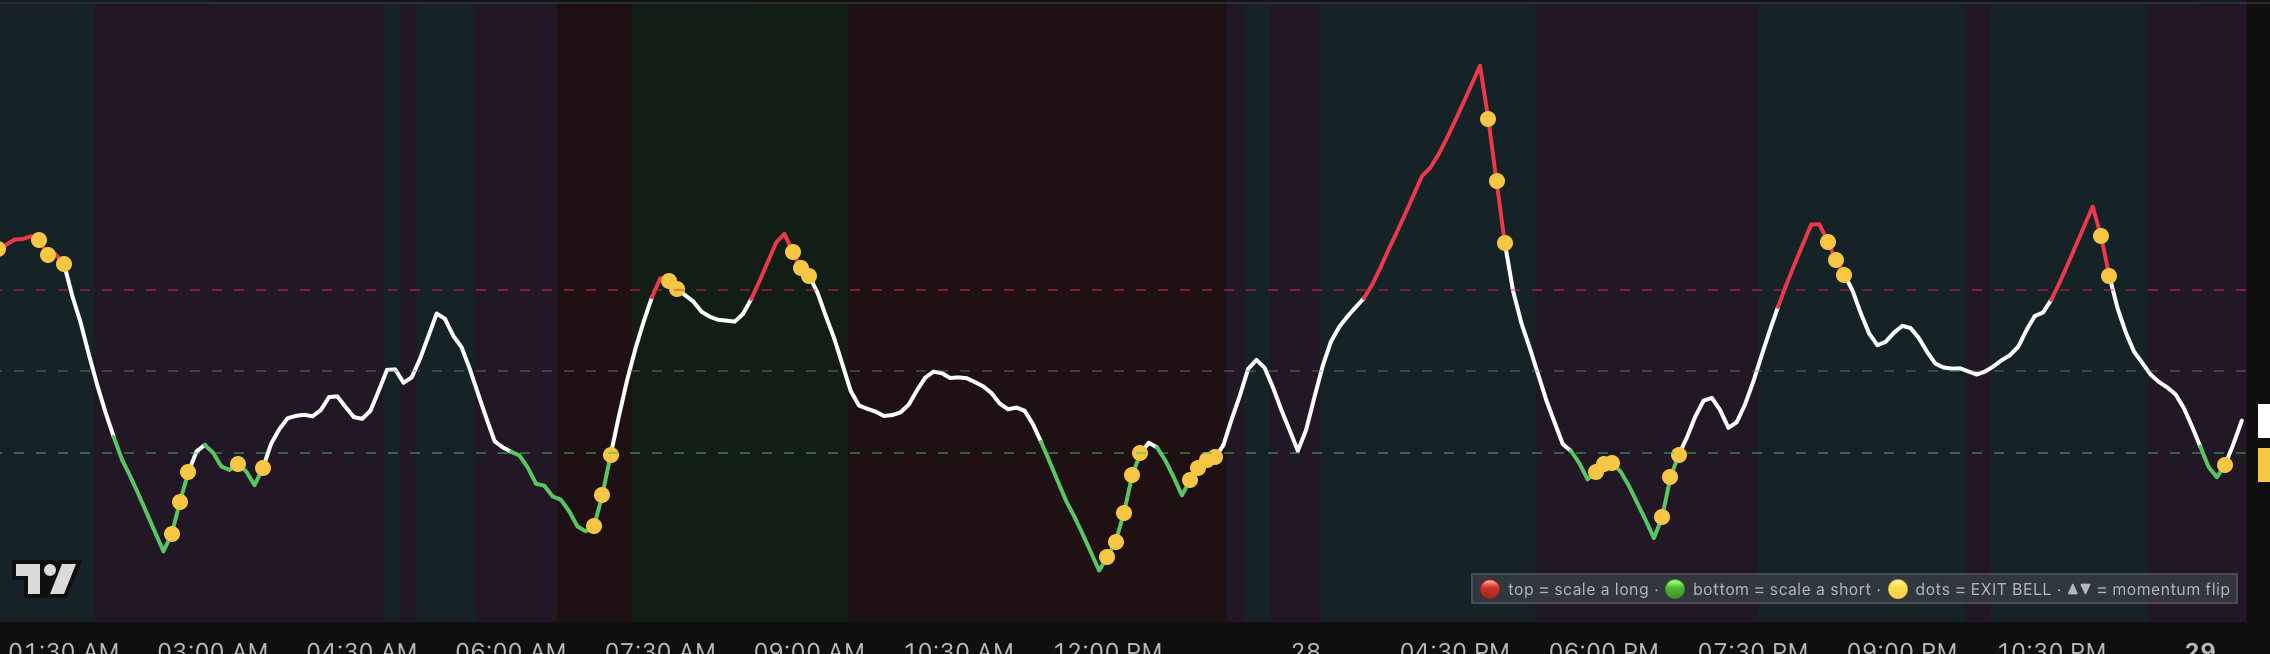
The OSOB pane — the wave, red tops, green bottoms, and the 🟡 gold exit dots
You get two tools. The first one tells you when to get in. The OSOB tells you when to get out. That's its only job.
OSOB just means: is it too high or too low? It shows when a move is getting tired, so you can grab your money before it turns around.
How to add it
The OSOB goes in a box under your chart — not on top of the candles.
Add the "Green Light Special — OSOB" tool in TradingView.
It opens in its own box below the price. That's where it goes.
Now you see your GET IN tool on top and your GET OUT tool on the bottom.
How to read it
You see
It means
You do
⚪ White line moving
move is healthy
hold, do nothing
🔴 Line turns red at the top
a buy is getting tired
get ready to take some money
🟢 Line turns green at the bottom
a sell is getting tired
get ready to take some money
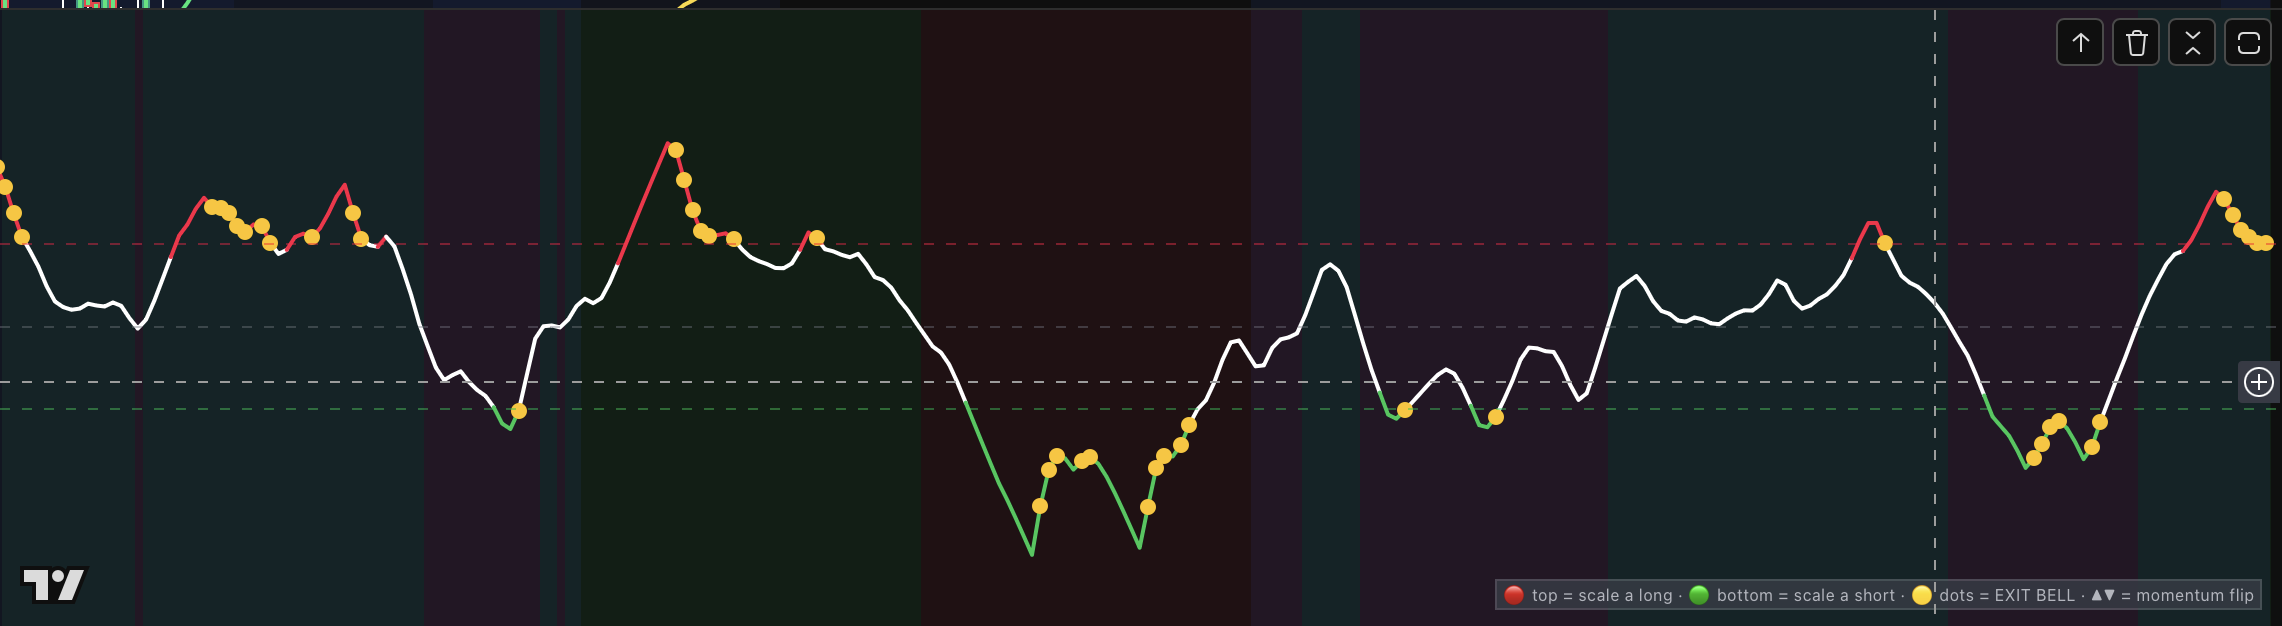
🟡 GOLD dot
it's turning around now
take some money. Move your stop up.
The gold dot is the star. When you see the gold dot, the move is running out of gas. Grab some of your money. Don't panic and sell it all — just take your first bit and lock it in.
Reading OSOB across a full session — red tops, green bottoms, gold exit dots at every turn
⚠️
The one ruleOnly use the OSOB to GET OUT. Never use it to get in. Never bet against the trend with it. In a strong trend it will say "too high" while price keeps going up and up — if you sell there, the trend runs you over. So: ✅ use it to take profit on a trade you're already in. ✗ don't use it to start a trade. ✗ don't sell just because it says "too high."
07
Use Both Tools to Win (a real trade, step by step)
Both tools together — the GET-IN tool on top, the OSOB exit pane on the bottom
Here is a real trade, step by step. This is how the two tools make money together. Your screen has the main tool on top and the OSOB on the bottom.
9:45. The 4 clocks all say UP. It's a buy day. (The OSOB is quiet. You're not in a trade yet.)
9:52. The top tool says 🔔 OPENING GO — BUY. It draws your stop line.
You buy. Stop goes on the dotted line. You risk a small set amount.
10:10. Price is going up. You're holding, watching your dotted stop. Down below, the OSOB line is climbing. You do nothing. Climbing is good.
10:24. The OSOB line hits the top and a 🟡 GOLD DOT shows up. Time to grab money. You sell half. That money is now yours to keep.
You move your stop to where you got in. Now you're playing with house money — your first half is locked in, and the rest is aiming for break-even or better.
10:40. Price keeps running. You let the other half run and trail it with the 🏄 8-EMA line.
11:05. A second gold dot shows up. You sell the rest. Done.
You hit your money goal for the day. Banner says STAND DOWN. You close the laptop. You won today.
💡
The big ideaThe top tool got you IN on the real move. The bottom tool told you when to TAKE YOUR MONEY. One without the other is not enough. Together, they are how you win.
Say it simple: Get in when the top says GO. Take money when the bottom shows the gold dot. Let the rest run. Stop when you hit your goal.
08
Manage a Trade (after you're in)
The tool does most of this for you, but here's what the lines mean:
First target: the first 🎯 line (traders call it "TP1" — just take-profit number one). When price hits it, take half and slide your stop to where you got in. Now the trade is safe.
Final target (the runner): the far 🎯 line. Let the rest ride to here, or trail it with the trend.
The trail: the tool moves your stop up behind price for you, so you keep more of a big win.
"OUT 🔄" (flip exit): if the trend flips against you, the tool says get OUT. The trade is over. Don't jump back in the same way — wait for a fresh signal.
🟢
The habit that makes the moneyTake a little at the first target, then let the rest run far. Small sure wins + one big runner = a green day.
09
The Money Rules (this keeps you from going broke)
Good trades still lose money if you break these. The tool does them for you:
🛡 The Firewall (turn it on)
Lose $500 in a day → the tool shuts you off. No more trading. No revenge.
Make $200 in a day → it says DONE. Walk away a winner.
Each trade risks a small, set amount (like $250). The tool sets your stop for you.
The 3 habits that make the money
No trade is fine. If the screen is quiet, don't trade. A quiet day beats a bad day.
Small losses, big wins. When the banner says RUNNER, let it run. This is the whole game.
Stop when you're up. Hit your goal? Close the laptop. Come back tomorrow.
🛡
The most important feature in the whole toolOne disciplined "done for the day" saves more accounts than any signal.
10
The Top Ways to Win (the big ones)
If you only remember a few things, remember these. These are what make the money:
Trade the open. The first 90 minutes is the best time. Catch the 🔔 OPENING GO on the 15-minute chart. That one trade can make your day.
Only trade when all 4 clocks agree. All up = buy. All down = sell. Mixed = wait. This alone saves your account.
Trade futures. ES, NQ, YM, or Gold. Real volume = clean signals.
Two charts, two jobs. 15-minute for the opening trade. 5-minute for the all-day scalper and dips.
Take half at the first target (or the gold dot). Let the rest run. Lock in money early, then ride the winner with the trend.
Small losses, big wins. Cut losers fast. When it says RUNNER, let it run far.
No trade beats a bad trade. If the screen is quiet, don't force it. Wait for the green light.
Stop when you hit your goal. Made your money for the day? Close the laptop.
One market. One way. Get great at ONE thing before you add more.
The simplest winning plan there is: trade the open on the 15-minute chart, only when the clocks agree, take half at the first target, ride the rest, and stop when you're up. Do that over and over.
11
Your Settings (what to turn on)
The tool has lots of switches. You only touch a few. Set these and leave the rest alone.
Setting
Set it to
What it means
Trading Style
Day Trading
in and out, same day
Opening chart
15-minute
to catch the opening trade
All-day chart
5-minute
for the scalper and dips
Firewall
ON
protects your account
Lose limit
$500
it shuts you off if you lose this much
Money goal
$200
it says DONE when you make this much
Scalper
ON
Way 2, already on
Strong-trend only
ON
fewer, cleaner trades
Scalp with intraday trend
OFF
makes the clocks really agree
Max range height
change 4 → 2
it ships at 4. Change it to 2 = "only tight, clean squeezes." Smaller = pickier.
Opening
ON
Way 1, already on
The switches you can leave alone
These are extra tools, most are off to start. You don't need them. But so nothing is a mystery:
🎯 Sniper — an extra advanced entry. Leave it OFF until you're experienced.
🔶 Level Regain — marks failed breaks that snap back. Off. Advanced.
🔄 Smart Reversal — marks tired moves at big levels (for exits). Off. Advanced.
🏛 BOS / CHoCH — marks when the trend structure breaks. Off. Advanced.
💧 Liquidity lines — shows yesterday's high/low (where stops sit). Turn on if you like targets.
📐 Discount/Premium — colors the cheap half vs the pricey half. Off. Optional.
🧠
Simple ruleIf you don't know what a switch does, leave it alone. The tool already set it right. The only ones you'll ever change are Trading Style, the two charts, the dollar amounts, and Max range height.
12
Your Daily Plan (print this, tape it to your screen)
☀️ Open your chart. Start on the 15-minute for the opening trade. Day Trading style.
👀 Look at the 4 clocks. All up? All down? Or mixed (skip it)?
✋ 9:30 to 9:45 → don't touch anything. Just watch.
🔔 Wait for OPENING GO → take it. Stop on the dotted line.
🔄 After the open, switch to the 5-minute for the rest of the day.
👟 Take the scalper, get-in boxes, and dip trades. Only with the trend.
🟡 See the gold dot on the bottom tool → take some money.
🚀 Banner says RUNNER → let it run. Banner says STAND DOWN → you're done.
💰 Hit your goal → close the laptop. Win the day.
13
The Mindset (the part that matters most)
You will lose some trades. That's normal. You win by keeping losses small and letting wins grow.
A quiet screen is not broken. It's keeping you safe. The best traders wait a lot.
Boring and steady beats exciting and broke. Every time.
Trade the plan. Let the tool do the hard part. Win your days.
🟢 Final Word
Welcome to the Green Light Special.
Get in when the top says GO. Take money when the bottom shows the gold dot. Let the rest run. Stop when you hit your goal. That's the whole game — be patient, wait for the green light, take the trade it draws, and protect your daily number.
When it's green, you go.
🟢 Get Access Today
When it's green, you go.
You've seen the whole playbook. Get it on your charts — both indicators plus the live signal group calling clean setups with you, all in one membership.
Real talk: trading can lose money. The Green Light Special and GLS OSOB are educational tools, not financial advice and not a signal-for-hire service. This tool does not promise wins or profit. It's built on solid market ideas, but no exact setup is promised to make money — the real edge is filtering, risk/reward, and discipline. Trading futures involves substantial risk of loss. Practice on fake money or small size first. Never trade money you can't lose. Past performance does not guarantee future results. This is teaching, not money advice.